
7 Common Jewelry Product Photography Mistakes (and How to Avoid Them)
You can learn on the subject of something through trial and error. it should take a moment, however eventually you will understand what to do—and what to not do. the matter is, this technique of learning isn’t terribly effective.
Don’t waste some time learning however to not photograph jewellery. Learn from our expertise instead.
Jewelry product photography comes with its own distinctive set of challenges. merchandise area unit little, reflective, and may be tough to stage for shooting. However, these challenges is simply overcome with a trifle little bit of designing.
Here area unit 7 common mistakes to avoid once photographing jewellery.
1. Smudged, Unprepared merchandise
Gloves for improvement jewellery
Clean jewellery when touching it. think about using gloves.
It sounds obvious, right? in fact, your jewellery ought to be clean and polished. The challenge comes from the extent of detail captured by a DSLR camera and correct lighting setup. the ultimate image can usually be blown up many times the jewelry’s reality size. Details invisible to your oculus are unconcealed once photographed.
Wipe down your jewellery when you bit it. carrying cotton gloves might prevent time and reshoots.
2. Inconsistent Shooting
Multiple photos of jewellery
Even slight changes will have jarring consequences.
Develop a collection of pointers for your jewellery photography and follow them. Consistency is essential in product photography, and variations from product to product or shot to shot can distract your client. Document everything: camera settings, lighting, background, and instrumentation position. confirm you’ll resume shooting on a special day with none noticeable changes.
3. complicated Background
Some inexperienced retailers look into a white background and assume “boring,” or “missed chance for stigmatization.” they fight to differentiate themselves with colourful, active backgrounds. That’s an error.
Bracelets and glitter
Don’t add distracting components into the background.
There’s a reason Amazon, eBay, Rakuten, and most marketplaces need or advocate a white or neutral background. an obvious white or lightweight grey background keeps the main focus wherever it ought to be: on your product. Black is additionally fashionable in jewellery photography, however remember you will have problem submitting pictures at some marketplaces.
Rings on white and black backgrounds
White backdrops area unit low cost and simple to form. you’ll use seamless white book, produce a lightbox, and even photograph white merchandise on white backgrounds.
4. unessential Props
This mistake relies on constant “keep your focus” principle we tend to simply mentioned. Props area unit a distraction you don’t want. {you may|you’ll|you can} assume your jewellery will look best once staged intricately, or even you simply need to indicate it during a lifelike manner employing a mannequin.
Necklaces on show
Left: The mannequin obscures a part of the jewellery and dominates the shot.
Right: this can be a stigmatization shot. Editorial photography differs greatly from product photography.
The reality is that almost all props draw attention off from your product. There area unit times wherever it’s applicable to use fashionable props, models, and attention-grabbing locations in shots that embody your product. Those area unit editorial shoots, for stigmatization functions. Editorials belong on magazine covers, as hero pictures on websites, and banners in emails. they are doing not belong on product class pages.
Three totally different jewellery displays
Use nominal props supposed to showcase jewellery which will be simply removed in post-production process.
Jewelry photography kits area unit comparatively cheap. Remember, you would like your jewellery photography to be consistent and centered on your product. Most props produce inconsistency and distraction.
5. Reflections everyplace
You want your customers to be gazing your jewellery while not making an attempt to fathom if that’s the photographer’s reflection or a flaw within the stone.
Necklace with 2 totally different refelctions
Reflections will ruin a product image.
The presence of gemstones and metal creates a technical challenge for jewellery product photography. It’s tough to shoot extremely reflective objects while not capturing distracting reflections. Follow this guide to dominant reflections, and check out a double overhead lightweight for shooting antimonial jewellery.
Jewelry in double overhead lighting
A double overhead lighting setup will minimize reflections.
Place your jewellery on a durable surface, sort of a table or a block, and position one giant studio lightweight on either aspect. Diffuse each lights with umbrellas. droop and sweep a roll of seamless white book behind and beneath your product, and connect the paper to very cheap of your optical lens. this can block off replicateions from the foreground and reflect a lot of lightweight back onto the topic.
Camera inform down
The right setup prevents ugly bright spots on your product pictures.
Position your camera on its rack so you’re shooting slightly down at the merchandise. Position your lights (with scattering umbrellas) on top of your product to either aspect, angle every down at the merchandise, and set them to constant power. This setup ought to equally fill the frame with lightweight while not making ugly bright spots on your product.
To get skilled trying results while not a full pic studio, explore the Halo and Foldio: cheap mini pic studios you’ll simply discovered reception or your workplace to require product photos.
6. Shaky pictures
It doesn’t matter what lighting setup you utilize if you are trying to appendage your camera. Handholding your camera or smartphone can either end in camera shake, otherwise you can have to be compelled to use one thing but full focus. Neither may be a fascinating state of affairs.
iPhone on rack
Wren smartphones have tripods.
Always use a rack. Tripods area unit low cost, effective, and improve each quality and consistency. once your camera is command steady by a rack, you’ll use best aperture and ISO settings. Mark a spot on the ground for your rack and it’ll be straightforward to copy your setup even once shooting on totally different days.
7. Poor Focus
Don’t take artsy low aperture shots of your jewellery that specialise in just one a part of the merchandise. High aperture, full focus photography can produce a pointy image that your customers will trust.
Your customer wants to see every detail. Give it to them with aperture settings of f/11 or greater, and set your ISO to as low as possible—preferably ISO 100.
Media Contact
Clipping Path Lab
https://www.clippingpathlab.com
[email protected]
CLIPPING PATH LAB- NUMBER ONE PHOTOSHOP SERVICES
Clipping Path Lab is your number one Photoshop Service for Removing Backgrounds, Photo Retouching, Clipping Mask, Shadowing, Ghost Mannequin Removal, Raster to Vector, Color Correction, e-commerce Image Editing, Jewelry Retouching and all other professional Graphic Design service.
Clipping Path Lab is an all-around well reputed top positioned image editing service who serve day in and day out. There are a considerable measure of organizations however no one but few can convey best quality like Clipping Path Lab.
Clipping Path Lab’s array of talented graphic design masters ensure they deliver projects on time using the right techniques. They give the complete online answer for all Photo altering by specialists in this industry and are accessible 24 hours for your requirements at amazingly low costs. They also assume finish liability for your Images and will re-try your pictures in the event that you are not 100% fulfilled. One of the aims at clipping path, is to build your deal and lessen your work weight.
Clipping path experts can provide all kinds of clipping path services like as simple, complex, overlapping, multiple and perfect image masking and background removal services. These photo editing services are mostly for Photo Studios, Design Agencies, Publishers, Online Stores, Brands and Manufacturing Companies.
The image masking group at clipping path are masters in all sorts of picture covering or assignments like erasing, color masking, channel masking, regular masking, transparency masking, alpha masking and layer masking. Clipping path also offer background removal as removing background from pictures are vital while putting into web based business locales or web shops.Background removal benefit is likewise important to change or supplant Image foundation or to set pattern a picture from its experience utilizing clipping path service.
If you are looking to get your photos retouched, Clipping Path provides the perfect photo retouching service by doing any kind of editing of your photos like as lighting, sharpening, color correction, glare, flare, sun spots or darkness even damaged photos. Their photo retouching and image restoration services are extremely strong above the industry standards and can help your business by saving huge time.
Other notable services rendered by clipping path include; ghost Mannequin, shadow making, web shop solutions and jewelry retouching, color correction, and raster to vectors.
About Clipping Path Lab
Clipping path laboratory has been working as image processors since 2012. The teams at Clipping Path Lab are highly qualified. They’re extremely knowledgeable on the industry standards and train had to make your images and designs look brilliant. They also boast unparalleled professionalism and heavy magnitudes of pleasant attitudes.
At Clipping Path Lab, they work with you to provide better clipping path serviceand make your visions a reality.
Media Contact
Clipping Path Lab
https://www.clippingpathlab.com
[email protected]
How to Add Virtual Makeup in Digital Photo Retouching
A blog post on the concept of virtual makeup and how to add that virtual glow to the digital photographs using photo retouching.
Add Virtual Makeup Using Digital Photo Retouching
Photography is a passionate hobby for millions of people. Many of them get so involved that they turn it into a full-time career. As people love keeping memories, the need for good photographers is always going to exist.
There are many different ways of earning money as a photographer, but to earn serious money, it is necessary to focus on creating astonishing portrait photos. They are necessary to master in wedding photography, urban photography, stock photography, fashion photography, and many other directions which a photographer might choose.
But, to make those photos really shine, it is also necessary to master your knowledge in photo retouching. If you want to reduce the expenses of outsourcing this process to a company which offers photo retouching services, it is best to learn more about Photoshop and other similar programs.
Let’s take a look at a great way of making any portrait look better by editing or adding makeup in your photos.
Analyzing the photo
To begin, it is necessary to run an analysis and see what is wrong with the image, that is, the makeup in the image. This is going to give you a clear set of goals that you should perform. To keep everything in check, get a sheet of paper, or a text taking software and note down all the particularities that you wish to correct, to make the image more appealing.
The most usual problems with makeup are:
These are some key things that you should be focusing on during the Analyzation phase. It will paint the right idea about the steps you should take. After taking the notes down, you should start thinking about the goals you wish to achieve.
Know your goalsFor a majority of portrait photos, getting the eyes right is the main goal, as they have the highest impact on the photo’s viewer. Therefore, making the eyes stand out should always be your primary goal.
Besides eyes, it is necessary to think about the other elements as well, which are colors and tones, facial smoothness, shadows, and lighting. Once you know your goals, you can start working on the things you wish to change.
Take care of the basics firstThe software tool with the most capabilities is Photoshop. Therefore, this guide will use the tools from this program.
To start, it is necessary to make sure that the subject of the image is centered well, and is the primary focus. Depending on the framing of the photo, you can rely on crop and rotation tools to highlight the model. To keep everything under control, create a double of the original photo, and press control-T to make all the necessary basic rotation adjustments.
Beauty is directly related to the symmetry of a person’s face. A great Photoshop tool that allows you to make minor facial adjustments is Liquefy. With it, you can make the model’s face more symmetrical.
For example, a shadow can be foundin some parts of the nose, and by smoothly using the Liquefy tool, you can remove the shadow and present the nose in a more symmetrical way. Additionally, this tool is great to use for the model’s neckline. But, make sure that you are very modest with this tool because overdoing these adjustments will make your model look completely different than in real life.
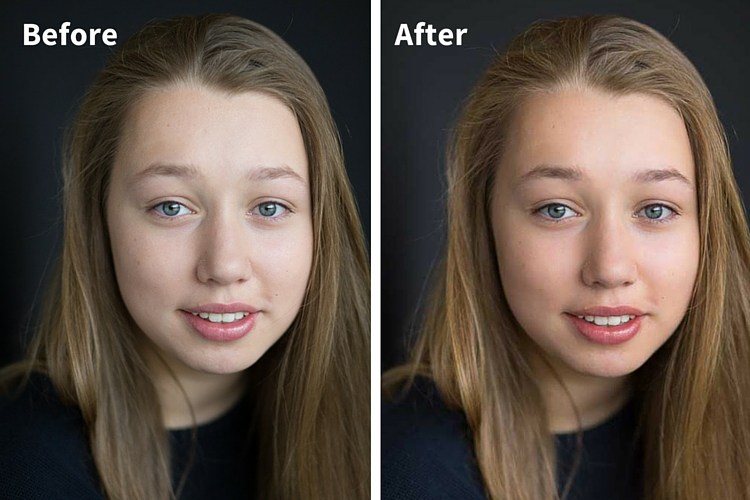
Smoothing the face
Now, the next step is taking care of smaller details such as freckles, acne, eye veins and facial hair. This is best performed with the Healing Brush tool and with the Stamp Tool. This is important to do before taking the next step of making a face look smoother.
Creating smooth skin involves the usage of Gaussian Blur, which lets you smooth the skin and keep the original tone, color, and texture of the image. It makes a great impact on how the model looks, as the face becomes completely smooth.
Move on to adding makeup
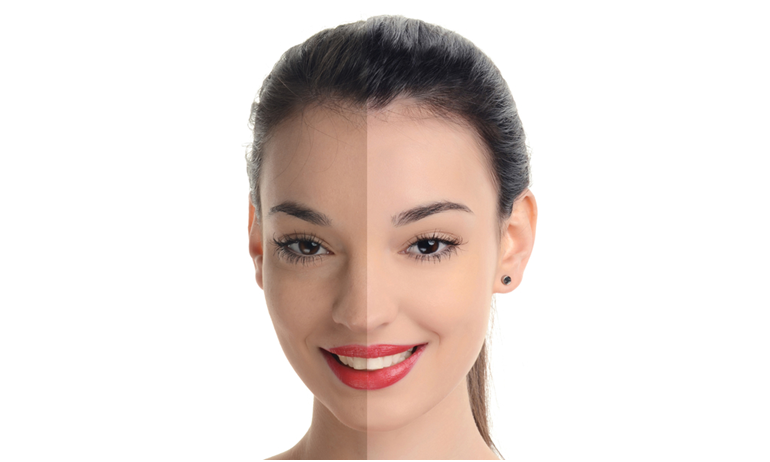
To know what you are doing, it is necessary to conduct online research and understand why makeup is applied to the face anyway. The overall goal is to express certain features of the face while also hiding others. This is achieved by playing with darker and lighter shades. The darker ones serve to put an accent on the person’s bone structure, whereas the lighter ones are perfect for highlighting the best facial features a person has.
For example, create a new layer and set it to soft lights. This is the layer that will allow you to paint a lighter skin tone. You are going to be using a Soft Round Brush to achieve this goal. Then, make another layer, but with a Linear burn instead of soft light, and use a different color, such as muted purple, to accent the cheekbones.
When it comes to eyes, creating a Smokey eye is very important, as people are used to seeing this in magazines. Pick a Hard Round Brush and, like with the face, go with a muted purple color to achieve this effect.
Lipstick is an important part. To create one, you will need to create another layer and use the Hard Round Brush once again. Use the Linear Burn setting when creating the layer. Red is the color that lets the eyes pop; therefore, you can use that color.
These are some of the tips to add makeup to your photo models easily. To get the best results, it is necessary to understand how makeup is applied. This will point you in the right direction when you are using Photoshop to add it digitally.
Get any type photo editing services visit here : https://clippingpathlab.com/
Add Virtual Makeup Using Digital Photo Retouching
Photography is a passionate hobby for millions of people. Many of them get so involved that they turn it into a full-time career. As people love keeping memories, the need for good photographers is always going to exist.
There are many different ways of earning money as a photographer, but to earn serious money, it is necessary to focus on creating astonishing portrait photos. They are necessary to master in wedding photography, urban photography, stock photography, fashion photography, and many other directions which a photographer might choose.
But, to make those photos really shine, it is also necessary to master your knowledge in photo retouching. If you want to reduce the expenses of outsourcing this process to a company which offers photo retouching services, it is best to learn more about Photoshop and other similar programs.
Let’s take a look at a great way of making any portrait look better by editing or adding makeup in your photos.
Analyzing the photo
To begin, it is necessary to run an analysis and see what is wrong with the image, that is, the makeup in the image. This is going to give you a clear set of goals that you should perform. To keep everything in check, get a sheet of paper, or a text taking software and note down all the particularities that you wish to correct, to make the image more appealing.
The most usual problems with makeup are:
- Hitting the right makeup base for an even skin tone is very hard to achieve.
- Sun is a factor that can affect the state of makeup, which might require correction in post processing.
- Consistency across the face is rarely pulled off. There are areas of the face where makeup is not well applied.
- The overall makeup color differs from the person’s skin and hair tone.
These are some key things that you should be focusing on during the Analyzation phase. It will paint the right idea about the steps you should take. After taking the notes down, you should start thinking about the goals you wish to achieve.
Know your goalsFor a majority of portrait photos, getting the eyes right is the main goal, as they have the highest impact on the photo’s viewer. Therefore, making the eyes stand out should always be your primary goal.
Besides eyes, it is necessary to think about the other elements as well, which are colors and tones, facial smoothness, shadows, and lighting. Once you know your goals, you can start working on the things you wish to change.
Take care of the basics firstThe software tool with the most capabilities is Photoshop. Therefore, this guide will use the tools from this program.
To start, it is necessary to make sure that the subject of the image is centered well, and is the primary focus. Depending on the framing of the photo, you can rely on crop and rotation tools to highlight the model. To keep everything under control, create a double of the original photo, and press control-T to make all the necessary basic rotation adjustments.
Beauty is directly related to the symmetry of a person’s face. A great Photoshop tool that allows you to make minor facial adjustments is Liquefy. With it, you can make the model’s face more symmetrical.
For example, a shadow can be foundin some parts of the nose, and by smoothly using the Liquefy tool, you can remove the shadow and present the nose in a more symmetrical way. Additionally, this tool is great to use for the model’s neckline. But, make sure that you are very modest with this tool because overdoing these adjustments will make your model look completely different than in real life.
Smoothing the face
Now, the next step is taking care of smaller details such as freckles, acne, eye veins and facial hair. This is best performed with the Healing Brush tool and with the Stamp Tool. This is important to do before taking the next step of making a face look smoother.
Creating smooth skin involves the usage of Gaussian Blur, which lets you smooth the skin and keep the original tone, color, and texture of the image. It makes a great impact on how the model looks, as the face becomes completely smooth.
Move on to adding makeup
To know what you are doing, it is necessary to conduct online research and understand why makeup is applied to the face anyway. The overall goal is to express certain features of the face while also hiding others. This is achieved by playing with darker and lighter shades. The darker ones serve to put an accent on the person’s bone structure, whereas the lighter ones are perfect for highlighting the best facial features a person has.
For example, create a new layer and set it to soft lights. This is the layer that will allow you to paint a lighter skin tone. You are going to be using a Soft Round Brush to achieve this goal. Then, make another layer, but with a Linear burn instead of soft light, and use a different color, such as muted purple, to accent the cheekbones.
When it comes to eyes, creating a Smokey eye is very important, as people are used to seeing this in magazines. Pick a Hard Round Brush and, like with the face, go with a muted purple color to achieve this effect.
Lipstick is an important part. To create one, you will need to create another layer and use the Hard Round Brush once again. Use the Linear Burn setting when creating the layer. Red is the color that lets the eyes pop; therefore, you can use that color.
These are some of the tips to add makeup to your photo models easily. To get the best results, it is necessary to understand how makeup is applied. This will point you in the right direction when you are using Photoshop to add it digitally.
Get any type photo editing services visit here : https://clippingpathlab.com/
10 easy Illustrator tools to improve your designs
Adobe Illustrator is one of the best graphic design software when it comes to designing your own logo and graphics. I use it for a couple of years now, and I am still in love with it.
But a lot of people ar afraid to take the leap in purchasing Adobe Illustrator because it looks too confusing. Can you relate? In this blog post, I will show you the top 10 easiest Illustrator tools to improve your designs. It even comes with video tutorials and a free 8-day email course that will teach you how you can design a professional brand for your blog.
Pen toolA pen tool is a tool that allows you to create your own graphics. Whether it is a heart or a jar with candy, you can design it all! You almost literally draw your own graphics. The pen tool is also mostly used to design logo’s, printables, for creating patterns, etc.
Curvate toolAre you having a hard time with creating curved lines with the pen tool? Then one of these Illustrator tools is perfectly for you: The curvate tool. This tool will automatically add curves to your path. So no drama with creating curves again!
White arrow toolAfter you just created your graphic, you notice that one anchor point doesn’t look how it had supposed to. Are you going to do it again? Don’t think so huh? Now it is time for the white arrow tool. Click on the graphic, select the anchor point you want to adjust and move it around! Amazing right? And no it’s not magic. This also works with paths. Why don’t you try it yourself?
your designsAdobe Illustrator is one of the best graphic design software when it comes to designing your own logo and graphics. I use it for a couple of years now, and I am still in love with it.
But a lot of people ar afraid to take the leap in purchasing Adobe Illustrator because it looks too confusing. Can you relate? In this blog post, I will show you the top 10 easiest Illustrator tools to improve your designs. It even comes with video tutorials and a free 8-day email course that will teach you how you can design a professional brand for your blog.
Pen toolA pen tool is a tool that allows you to create your own graphics. Whether it is a heart or a jar with candy, you can design it all! You almost literally draw your own graphics. The pen tool is also mostly used to design logo’s, printable, for creating patterns, etc.
Curvate toolAre you having a hard time with creating curved lines with the pen tool? Then one of these Illustrator tools is perfectly for you: The curvate tool. This tool will automatically add curves to your path. So no drama with creating curves again!
White arrow toolAfter you just created your graphic, you notice that one anchor point doesn’t look how it had supposed to. Are you going to do it again? Don’t think so huh? Now it is time for the white arrow tool. Click on the graphic, select the anchor point you want to adjust and move it around! Amazing right? And no it’s not magic. This also works with paths. Why don’t you try it yourself?
your designsAdobe Illustrator is one of the best graphic design software when it comes to designing your own logo and graphics. I use it for a couple of years now, and I am still in love with it.
But a lot of people ar afraid to take the leap in purchasing Adobe Illustrator because it looks too confusing. Can you relate? In this blog post, I will show you the top 10 easiest Illustrator tools to improve your designs. It even comes with video tutorials and a free 8-day email course that will teach you how you can design a professional brand for your blog.
Pen toolA pen tool is a tool that allows you to create your own graphics. Whether it is a heart or a jar with candy, you can design it all! You almost literally draw your own graphics. The pen tool is also mostly used to design logo’s, printables, for creating patterns, etc.
Curvate toolAre you having a hard time with creating curved lines with the pen tool? Then one of these Illustrator tools is perfectly for you: The curvate tool. This tool will automatically add curves to your path. So no drama with creating curves again!
White arrow toolAfter you just created your graphic, you notice that one anchor point doesn’t look how it had supposed to. Are you going to do it again? Don’t think so huh? Now it is time for the white arrow tool. Click on the graphic, select the anchor point you want to adjust and move it around! Amazing right? And no it’s not magic. This also works with paths. Why don’t you try it yourself?
Lasso toolYou already probably figured out that you can select things by dragging a square. But what if we want to select another shape that doesn’t fit in the square? That is why Illustrator has a lasso tool. With one of these Illustrator tools, you can draw a selection. I found this out a year after I started with using Adobe Illustrator, and I don’t want you to happen the same, haha.
PathfinderThe pathfinder is one of the most amazing Adobe Illustrator tools. With this tool, you can cut out shapes, merge shapes, divide them, and a lot more. I use this Adobe Illustrator tool most of the time when I want to merge shapes or cut out things. I created a graphic here, that I also used in my other post:
Gradient Mesh toolSay hello to the most amazing gradient tool ever. With this, you can create gradients that adjust themselves to the shape you created. Yea that probably sounds really hard. Let me try to explain this Illustrator tool, and if you still don’t get it, you can watch the video down below.
After you created a shape, select the Gradient Mesh tool, and then click somewhere on your Graphic. Now you probably see a weird misshaped cross now with a little square (we call that an anchor point) in the middle. Now grab the white arrow tool, and then select the anchor point, and give it another fill color. Now it is a gradient. You can add as many squares as you want if you want to create a more detailed gradient.
Image TraceA lot of graphic designers hate this Adobe Illustrator tool, but it actually is really handy. If you just want to trace a logo, (for example twitter to design your own share buttons) you can just insert the image, and then click image trace. The image tracer will automatically trace the logo. Now click expand, and ungroup, and you can move the part around that you want. Just delete the unneeded parts, and tadá, this is how you create your own share buttons the easiest way.
Clipping MaskEver wondered how people created a picture in a circle, star or another shape? Well here is your answer. The clipping mask tool. With this Illustrator tool, you can also ‘’cut out’’ thing in the shape that you want, but just a little different. First, you need to create the shape. Whether it is a cupcake or a circle, It is all possible. If you have 2 separate shapes, make sure to merge them first with the Pathfinder tool
After you created the shape, insert an image or a graphic. Place the shape on top. Next, select them both, and go to Object>Clipping Mask>Make. (my screen recorder won’t show the menu Sorry!) Now you know the secret of creating different shaped pictures. Psst, don’t tell anyone. Hahaha actually, you should tell anyone because more people need to know about these Illustrator tools.
Blend toolDid you ever created 2 different shapes and you were like: If I only could think about a shape that is between those shapes. Hello, Blend Tool! With this tool, you can create 2 different graphics. Next, select them both, click on the blend tool, and they create a kind of gradient from the one shape to the other one. Double click on the tool, and select the specific steps option, and fill in the steps that you want. Go to object> expand. Now they are all converted to different, editable shaped. Select the shape you like the most of them and tada! Amazing right?
Touch type toolEvery Graphic Designer has probably a passion for fonts. We don’t download movies or games, we download fonts (That’s what my boyfriend said once haha). So when you download those amazing free fonts, there is always a little pain in the *beep*: Bad kerning! If you really pay attention to that, you see bad kerning everywhere (unfortunately). So how can you fix that you probably asking? With the touch type tool my friend! With one of these amazing Illustrator tools, you can select each letter of a word, and move it around. Fixing bad kerning has never been easier.
Still not convinced? But now you know why I don’t use Canva, and why I am not going to use it in the future. Why to use Canva if we can create unlimited Graphics with Adobe Illustrator. How many times I have been on Pinterest and I see the same background photo, the same graphic, and the same font every time?!
6 Tips for Freelance Graphic Designers

can’t believe it’s already been six months since launching Spruce Rd. in January! Seriously, time flies. i believed it’d be fun to share my reflections from these past six months, and be clear in what worked and didn’t work for my business. I announce concerning the teachings learned from my 1st month of freelancing, if you would like to visualize that out as well!
Stay tuned at the top for a FREE bonus, the Freelance guide list. This list is certainly one thing that I want I had beginning out, and it provides a number of steps for your freelance career to stay you on target.
What worked Attracting ideal clients One of the main reasons I launched my own business was to work with clients that were a better fit with my vision. I desired to work one-on-one with clients, who valued the design process, and wanted quality design. I didn’t want my portfolio to be passively influenced by the projects that came my way, so instead I opted for tailoring my blog content and portfolio to my niche market. I am still working on defining this audience right now, but I would say they love good design, are passionate about their small business, and are eager to get noticed online!
I can’t tell you how great it felt to finally work with a client who fit this profile to a T. I am SO thankful for these wonderful clients, and the joy of being involved in launching their business, and bringing it to that next level.
Community have been blown away by friendships I have formed online through my business. It really has been one of the best benefits of going out on my own, and was entirely unexpected. It was amazing that the first time I talked to another fellow designer on the phone, I left feeling energized and as if we were long-time friends. Since launching Spruce Rd., I can say I have truly gained friendships that have pushed me both creatively and in my business. I would bet that behind most successful entrepreneurs, there is a team of supporters + cheerleaders that propel them forward. I can say that has definitely been true for my business, and I am forever grateful for it.
Blogging Prior to going full time with Spruce Rd., I knew that prioritizing my blog was necessary to get my name out there. The blog has brought in the most traffic to my site, most of which has come from Pinterest. If I didn’t have a blog, it would be challenging to build my business online. If you don’t enjoy blogging, definitely don’t pursue it. It consumes a lot of time + energy, so it is important that it aligns with your vision and is something you enjoy. If I didn’t have a blog from the beginning, I would have pursued guest blogging, webinars, or other social media to put myself out there. I am thankful that my blog has brought me clients, and even facilitated collaborations with fellow designers!
Book keeping On a seemingly boring note, I have not been stressed about bookkeeping! I know this is a hangup for many freelancers, and I decided early on that I would not let it deter me from pursuing my business. I hired an accountant from the get go, invested in an online bookkeeping system (Quick books), that makes my accountant’s life easy, and made sure I kept it updated every week.
Packaged Services After payment multiple hours per week replying to inquiries with a custom proposal, I finally took the leap and commenced providing prepacked services. Most of the inquiries were looking for similar services, thus I created three tiers of branding packages. I even denote them on-line, that has saved American state lots of time! I no longer waste a potential client’s time in reaching bent American state for a quote, and instead they’re going to instantly browse my prices and see if we’ve got a bent to square measure the proper work. I in addition spent associate excessive quantity of your time at intervals the initial couple months, emailing back and forth with potential shoppers, entirely to go looking out out they weren’t positive what they were looking for. Posting my prepacked services on-line has eliminated the e-mail chains.
Block out time for office hours Since my husband is in graduate school, his schedule is inconsistent between varied category times, and hours of learning. thanks to this, I even have guilt-free opted for a loose schedule. I worked-out middle day, worked some hours, took a possibility, worked into the night, etc. I had some structure to the day, however no specific set hours. currently that he’s nearing the top of college and encompasses a 9-5 field work schedule, i spotted i want to stay to a schedule. i believe a want for a routine is innate in every people, and that i am realizing that additional and additional.
Guide to Fixing White Balance in Processing
Although I continually suggest setting your white balance privately (and here’s my favorite thanks to do it!) it’s comparatively straightforward to correct your white balance in process, in either Photoshop / components and Lightroom. If you have got a neutral tone in your image, then you’ll virtually fix it during a matter of minutes (if you do not, it is a bit a lot of difficult, however still do-able!))
Checking and fixing your white balance ought to be the primary factor you are doing in writing to a picture, thus here’s a way to do it!
Step One: Grab Your White Balance Tool The first thing you need to do is grab your white balance tool – this looks like a big dropper. They look a little bit different in ACR and Lightroom, so I’ve taken a screenshot of each below so you can see what they look like.
Step Two: Check Your Neutral On the left is an image that I took where I didn’t set the correct white balance in camera (tsk, tsk) and I’ll use this today to demonstrate a couple of different ways to set your white balance in processing.
You can probably tell just by looking at it that it is too cool (all that blue!) so we need to check and change the white balance on this one for sure!
However, if you weren’t so sure whether the white balance is correct, you can check it – by hovering your white balance tool over a neutral area.
In this particular image, there are a number of neutrals we can use (neutrals being anything white, black or grey) and having a neutral like this in your image makes setting the correct white balance much easier. In this case, we could use the sidewalk / pavement or even the grey boots to set our white balance.
All you need to do is take the white balance tool and hover over your known neutral. If the RGB numbers aren’t all almost equal (it doesn’t matter what the numbers are, just that they are all the same or nearly the same) then your white balance is off!
Step Three – Click on The Neutral AreaChanging your WB super easy, simply click with your dropper on your chosen neutral area – in this case I’m clicking on the concrete on the sidewalk – and your image will change to the correct white balance by making the RGB numbers of that area the same. (told you it was easy!)
As you click around the neutral area you will find that your will get a slightly different color to your image. All you need to do is choose a white balance that is most pleasing to you, or what looks the most like the scene really did. Get it as close as you can at this stage.
Step Four – Fine Tune with The Sliders From here, you might need to fine tune by moving the sliders that are just underneath your dropper tool in Lightroom (or at the top of the basic panel on the right in ACR)
If you’re thinking that it’s still too cool / blue move the temperature slider to the correct toward yellow, too heat and you progress it move it towards blue. you would possibly conjointly ought to modify your tint sliders – once more if the image is wanting too pink overall then move it toward inexperienced, and if it’s too inexperienced slide it over by some notches toward the magenta slide. If you’re unsure, move the sliders separately – you’ll begin to examine a distinction and see if it’s higher or worse than before!
Help! There Isn’t A Neutral (or it gives you a wonky looking image) Assuming you shot in RAW (and if you don’t this can be a reasonably smart reason to try and do so!) you may have an inventory of white balance choices from the drop menu right the correct. merely select the white balance that was nighest to the conditions you shot in. For this explicit image, the day was terribly overcast, therefore i might select Cloudy or Shade from the change posture menu.
From there, again, you will probably need to move your sliders to get the right white balance.
If you are a JPEG shooter you won’t have these drop down options, your only option is to move the temperature and tint sliders to get it right (and make a note to find out how to make the switch to RAW)
Here’s the same image with the white balance corrected.
5 Camera Options for Underwater Photography

It started innocently enough – a fast visit to Amazon to buy a disposable waterproof camera to induce some underwater shots. Four hours later, I had somehow managed to develop associate underwater camera obsession, and will even be seen eyeing up I like lite Housing for my DSLR at a walloping $1,700. I actually have checked out everything from disposables to “rugged” cameras to underwater housings, therefore i assumed i might place all that recently gained information to sensible use and list a number of the choices that square measure accessible to you if you fancy taking some underwater footage yourself.
1) Disposable Camera A very cheap and cheerful option priced at around $9 a go is the waterproof disposable camera. Image quality will be poor and you get zero control of any description, but if you just want to record the moment you can’t really go wrong. This is what I have used in the past, and whilst the image quality is poor (poorer than an iPhone snap) for price they can’t be beaten.
2) WaterProof Housing for iPhoneThe second option I looked at was a waterproof housing for the iPhone – I looked at two: the LIfeProof ones, and the Watershot ones (which someone else helpfully pointed out to me) Of the two, the Watershot one looks the best – the number of reviewers stating that their cameras didn’t work after using the Lifeproof case really put me off: I want my $500 phone to be in one piece after an outing to the pool! There are a few of these housings available, just do your research and make sure you test them before bringing your iPhone into water with it. This is a great option if you just want to take casual pics, and have the ability to use what you already have!
3) Rugged WaterProof Point and Shoots
There area unit some of those on the market, every at completely different worth points. As a rule they’re all waterproof, shock proof, drop proof and then on, creating them ideal for delivering to the youngsters to require photos or for general family holidays at the beach or pool etc. The draw back to those is that the Image quality is poorer than those in love a comparable purpose and shoot that does not have an equivalent “tough” issue.
Here are some of the ones available and their price points.
Fujifilm FinePix XP80 around $175
Olympus TG-860 around $230
Canon PowerShot D30 – around $250
Ricoh WG-5 around $260
Olympus TG-4 – around $380
Nikon 1 AW1 around $700
Naturally, as you go up the price points the features go up: if you are interested primarily in photo quality look at the aperture, ISO speed, sensor size, autofocus speed and frames per second, just as you would with any camera. If you intend to do deeper diving etc, then look at the “toughness” specs – they all have different ratings for underwater etc.
4) Point and Shoot with Underwater Housing If you already have a point and shoot then this might be a no-brainer, you can simply pick up an underwater housing for it and away you go! The only point and shoot I have is years old, and therefore the specs of it are surpassed even by the rugged point and shoots, and to add to it, underwater housing hard to come by for this model and therefore expensive. If you have a newer model though, you should be able to pick up a housing relatively cheaply. You’ll get better results if you get a housing built specifically for your point and shoot model, so you’ll need to search on Amazon for it. These range from about $100 to $400, depending on manufacturers etc.
If you don’t already have one, but are more serious about underwater photography, then you can of course buy a decent point and shoot and the housing, and this will give you better control and image quality than the rugged versions above. A friend of mine said that she noticed that many pros used the Sony RX100 (original model which is priced around $400) combined with a underwater housing (at around $150 upwards depending on brand) and were taking amazing images with them – and as usual she was right It looks like a good combination that is relatively inexpensive and will give you great looking images.
5) Waterproof Housing for your DSLR
If you are really serious about taking decent underwater shots, then you can also invest in an underwater housing for your DSLR. At this point, I would not scrimp on quality as if water gets in, it’s toast for your DSLR so it’s a pricey mistake. I likelite are generally considered to be the best – the one for the Canon 5D Mk3 comes in at a whopping $1,799 though. This takes it out of many people’s price range, and although of course you can get cheaper versions (one from Neewer for example only costs around $600) it’s still only worth it if you are serious about underwater photography.
The plus side is you get complete creative control of your images, both in capture and in processing.
Which is the right one for you?I think that covers all the categories of choices on the market, and that i do not believe that one is desirable to the other: it depends on however serious you’re concerning underwater photography, or whether or not you simply need a family friendly choice, and after all what proportion you’re willing to pay. If you simply need a laugh with the camera then opt for a disposable or one amongst the cheaper rugged purpose and shoots. If you continue to wish to require semi-decent pics, and love the thought of getting a camera that’s just about indestructible (i.e five year recent proof!) and one thing for family holidays then get one amongst the upper priced rugged ones. If you actually do wish to urge the simplest footage doable however still during a “normal” surroundings, then either a degree and shoot with housing is your best bet, or Associate in Nursing Associate in Nursing underwater housing for your DSLR if you’re terribly serious concerning it.
Getting Started with Adobe Photoshop
Adobe Photoshop includes a ton of tools and it are often quite confusing for a beginner. That’s wherever the new ‘Learn Photoshop’ series comes in. I’m about to show you ways to use a number of the fundamental tools and can eventually teach you ways to edit your photos and build higher web log pictures. I’m aiming to write one tutorial for beginners each month, and you’ll be able to notice them within the Photoshop a hundred and one class.
If you don’t have Photoshop you’ll be able to transfer it as a free thirty day trial from Adobe’s web site. For those desperate to decease, there’s a good Photography arrange at solely $10/month (it conjointly includes Light room) or if you’re a student you’ll be able to get the whole inventive Cloud set at a special worth. you’ll be able to conjointly notice older versions of Photoshop at sensible costs.
Lesson 1: Getting started with Adobe PhotoshopToday’s lesson can show you the way to form a replacement document and that we also will take a glance round the work area.
Creating a replacement document
When you launch Photoshop, you’ll notice that there area unit lots of tools, however there isn’t any document. you’ll produce one by planning to File/New or by pressing Ctrl+N. A box can appear with lots of choices.
Name: you’ll name your new document or add a reputation after you reserve it
Document sort and image size: Photoshop features a few predefined documents like paper (letter, tabloid, and international formats like A4), photo, web, and art boards. you’ll conjointly opt for a custom size.
dimension and Height: For custom sizes, you’ve got to introduce the peak and dimension of the document and you’ll add it in pixels, inches, centimeters, millimeters, points, and picas.
- Resolution: refers to the amount of pixels per in. that may be written on paper and therefore the size of these pixels. If you wish to create internet pictures you ought to opt for seventy two pixels/inch, however if your pictures area unit for print, you ought to opt for a minimum of one hundred fifty pixels/inch, although it might be higher to line it at three hundred pixels/inch.
- Color Mode: color modes determine how an image will be represented in print or on screen. If you want to edit photos or make images for the web, you should use RGB color mode, but if you want to make images for print, you should work in CMYK color mode. Let’s take a look at the 5 color modes:Bitmap: it’s a black and white image that’s formed only from black and white dots, with no color levels in between
- Greyscale: it also uses only one channel like bitmap, but it has intensity levels from 0 to 255. You can use it if you want to print your image on a noncolor printer.
- RGB color: this is what you will use if you want to make images for the web. This color mode is used by computer monitors and the human eye. It’s divided into 3 color channels (red, green, and blue) and each channel has intensity levels that range between 0 and 255.
- CMYK color: is used for printing and it’s made up of 4 channels: cyan, magenta, yellow, and black.
- Lab color: it has two channels dedicated to color and one to intensity.
- Background Contents:you can choose between a white background, a transparent one, or you can choose a different color for it.
- Canvas: is the main work space where you will create and modify images.
- History: you can access the History panel from Window. It allows you to see the actions you have taken and you can even go back up to a previous point in your work.
- Layers: each layer on your canvas is an individual level and work done on a layer is independent of the other layers. Since layers are one of the most difficult concepts to understand, the next lesson will focus on them.
- Tools: the toolbar is full of useful tools, but it takes some time to learn all of them. Some of the most important are:the marquee tools: allow you to make selections
- the brush tool: can be used to write or draw
- eraser tool: deletes a certain color or the whole layer
- eyedropper tool: allows you to select the color from an image
- paint bucket and gradient tool: will fill the whole layer or a selected area with color or gradient
- pen tool: you can make shapes or selections
- text tool: adds text to images
- shape tools: allows you to draw different shapes
Make 2017 Your Photography Year
How to make 2017 your Photography 1 Year ) Try. Excuses hold you back.That was one of my biggest flaws in 2016. I had a head swimming full of ideas but I got caught up in not “having the time.” I used having two businesses, a blog, and a toddler as excuses to just be lazy. Time is relative. If something really matters to you then you find the time. You make the time.
I chose not to because (quite frankly) I was exhausted. I missed out on a lot of opportunities for some killer images that I could have created. This is something to avoid in the future.
For you, it could have been something as simple as not having the time, feeling exhausted/overwhelmed, or (more dangerously) being afraid of taking that next step. Whatever the reason, whatever held you back, we all need to try to be more proactive in the new year. Spend more time behind your camera, create that shoot you’ve been dying to try, learn more about your business. Make 2017 your photography year.
2) Don’t immediately think that you need to upgrade your equipment. Sometimes you just need to invest in a good class.Everybody loves a new shiny lens or camera body but then they aren’t really working their current equipment to its fullest extent. If you truly feel like your camera or lens is holding you back then an investment in new equipment might be just what you need. If you are just frustrated with where your images are because you don’t know how to achieve that “look” then invest your money in education.
I’ve had a lot of people tell me that they’ve spent their funds on a new lens because that was the lens that “so and so” uses and their images are just gorgeous. They were super disappointed to find that they still could not achieve a similar look for their own art.
Here’s the secret. It’s not really the lens. Or the camera body. Or their editing software. It’s not really any one thing that “so and so” does to get those dreamy shots that fill you with blinding envy. No, “so and so” knows how to work that lens. They know how to pose. They know how to frame their subject. “So and so” knows how to edit in order to achieve that look. They took the time to learn how to rock what they have. You should as well.
Here are a few places to check out:
Shooting just for the joy of it can enrich your art, help you find joy in your work, and recharge your creative batteries. More importantly, it allows you to learn new things which you are going to have to do if you want 2017 to be your photography year.
4) You don’t neglect the business side of things.I don’t know about you but the business-y side of my businesses are no fun. I don’t find any excitement in marketing or learning about how to reach clients. But learning about these things are critical to keeping your dreams alive. Having a creative Graphic design business is still a business, and it needs to be treated as such.
Pick one thing that you are really failing at and crack down. Find some reading material about it, take a class, and put what you learn into action.
I hope that 2017 is a great year, and you totally you rock it. I hope that next year is your photography year.
ShareShare Make 2017 Your Photography Year
I chose not to because (quite frankly) I was exhausted. I missed out on a lot of opportunities for some killer images that I could have created. This is something to avoid in the future.
For you, it could have been something as simple as not having the time, feeling exhausted/overwhelmed, or (more dangerously) being afraid of taking that next step. Whatever the reason, whatever held you back, we all need to try to be more proactive in the new year. Spend more time behind your camera, create that shoot you’ve been dying to try, learn more about your business. Make 2017 your photography year.
2) Don’t immediately think that you need to upgrade your equipment. Sometimes you just need to invest in a good class.Everybody loves a new shiny lens or camera body but then they aren’t really working their current equipment to its fullest extent. If you truly feel like your camera or lens is holding you back then an investment in new equipment might be just what you need. If you are just frustrated with where your images are because you don’t know how to achieve that “look” then invest your money in education.
I’ve had a lot of people tell me that they’ve spent their funds on a new lens because that was the lens that “so and so” uses and their images are just gorgeous. They were super disappointed to find that they still could not achieve a similar look for their own art.
Here’s the secret. It’s not really the lens. Or the camera body. Or their editing software. It’s not really any one thing that “so and so” does to get those dreamy shots that fill you with blinding envy. No, “so and so” knows how to work that lens. They know how to pose. They know how to frame their subject. “So and so” knows how to edit in order to achieve that look. They took the time to learn how to rock what they have. You should as well.
Here are a few places to check out:
- CreativeLive
- Robert Cornelius Photography (for those Fine Art Composite junkies)
- Phlearn
- The Educated Shutter (That’s me!! Seriously, you should check out my tutorial page. You know you want to.)
Shooting just for the joy of it can enrich your art, help you find joy in your work, and recharge your creative batteries. More importantly, it allows you to learn new things which you are going to have to do if you want 2017 to be your photography year.
4) You don’t neglect the business side of things.I don’t know about you but the business-y side of my businesses are no fun. I don’t find any excitement in marketing or learning about how to reach clients. But learning about these things are critical to keeping your dreams alive. Having a creative Graphic design business is still a business, and it needs to be treated as such.
Pick one thing that you are really failing at and crack down. Find some reading material about it, take a class, and put what you learn into action.
I hope that 2017 is a great year, and you totally you rock it. I hope that next year is your photography year.
ShareShare Make 2017 Your Photography Year
- LikeMake 2017 Your Photography Year
Which Lens Is Best for Lifestyle / Documentary Photography
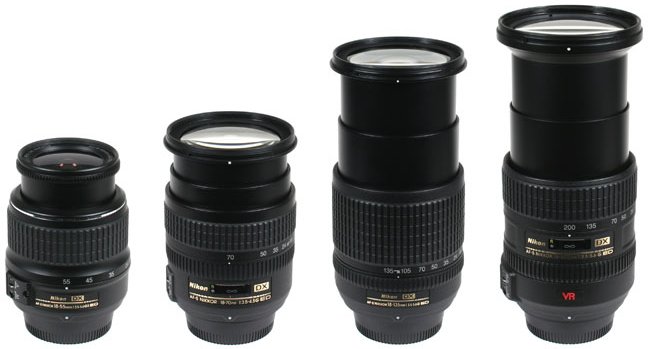
If you are shooting Lifestyle or Documentary images - in other words capturing your everyday life - which lens is the best for you to use? Well, that is a pretty big question as there a number of options available to you, and each have their own plus and minus points, or things they are best suited for. This is one reason why many people will have two or three (or more!) prime lenses, or a couple of zooms, so that they have a range of lenses that they can pull out to give a different look. That, or they have a small lens addiction
Of course, sometimes you just don't know which lens would be best suited to you, or for a particular look/job, so I've listed some focal lengths below that will give you an idea of which each lens would be good for, and when I personally pull each one out of my own (too large) stash to use.
Wide Angle (such as a 28 or 35mm)This really is such a great focal length for indoor lifestyle / documentary photographs! A wide angle is definitely my go-to lens for using inside, as I can capture the subject and some of their surrounding environment too. It can also make a great lens for including several members of the family in a group shot, and although perhaps not the most flattering for head shots - due to the slight distortion wide angles produce - it still can be used quite effectively for lifestyle head shots on children as the distortion can add a quirky element that actually works quite well with kids!
It’s also great for outdoor shots where you really want to show the environment - beach or field shots for example - anywhere where you want to include some of the landscape.
A wide angle is also an inclusive lens, which makes you feel more like you are standing right in the middle of the action when you view the photo.
Some suggested lenses:
Canon 28mm / Nikon 28mm
Canon 16-35mm / Nikon 16-35mm
Sigma 35mm (both Canon and Nikon Versions)
Canon 24-70mm / Nikon 24-70mm
Tamron 24-85mm (both Canon and Nikon versions)
The Standard 50mmThe 50mm Lens is a camera bag staple, and rightly so due to it’s huge versatility. You can use it in- doors and outdoors, and it can be used for both lifestyle and portraits due to the fact there is no or little distortion. A 50mm prime is generally also very lightweight and easy to carry, so it’s perfect for popping into your bag to take with you. I use this indoors for times when my 35 is just allowing just too much of the environment in, and I don't want to have to get right up to my subject, and also for shots outdoors. It's just a fab all rounder for a focal length - a Can rue workhorse!
Some suggested lenses:
Canon 50mm F1.8
Canon 50mm F1.4
Nikon 50mm F1.8
Sigma 50mm F1.4
85mmGenerally, I use this lens for times when I am outdoors with my subject, and I want to allow them to have some space to move away from me. The longer length gives wonderful compression too, which helps give you those super blurry backgrounds. It’s also very useful for taking detail shots - for example, little hands on the paint brush or tying their shoes, without you having to go right up to them! It’s a gorgeous, gorgeous length for a portrait lens - it gives a very slight slimming affect on the face which is tuber-flattering.
Some suggested lenses:
Canon 85mm F1.8
Nikon 85mm F1.8
Telephoto (85mm +)Longer lenses give fabulous compression, and therefore are wonderful for giving images a dreamy feel and really help to isolate the subject from the background. You know those images that look like their subject is "popping" off the background? That's usually down to using a telephoto.
They are generally too long to be used for indoor lifestyle (Although I have certainly used them indoors, when I am in full super-sleuth mode and trying to capture something without having anyone groan and moan at me, and of course have enough space to back up!) but can be invaluable for outdoor shots, or things like plays or sporting events when you have no choice but to have some distance between yourself and the subject. I use my 85mm for most outdoor shots, so my 135 and 200 are rarely used actually, except for sports and areas where I can allow my subject can get quite far away from me safely - for example a beach. (As a side note, I really should part with one of these since they are quite similar with the look they give, I just can't decide which one to get rid of!)
Some suggested lenses:
Canon 135mm F2.0 / Nikon 135mm F2.0
Canon 70-200mm
Sigma 70-200mm
ShareShare Which Lens Is Best for Lifestyle / Documentary Photography
- LikeWhich Lens Is Best for Lifestyle / Documentary Photography
- if you any kinds of photo editing service please contact with us : https://clippingpathlab.com
Tips for Shooting in Low Light
Ah yes, shooting in low light. Something that can be terribly frustrating if you don't understand how to make the most of the situation! (And even when you DO know how to handle it, it can STILL be frustrating some times!) I remember the queasy knots in my stomach during the first SUPER DARK wedding reception that I shot when I first started shooting weddings- it wasn't a good feeling. But because I come across all types of less-than-stellar lighting situations as a wedding photographer, I've had to learn how to make low light situations my bitch.
1. Use a wide open aperture.The more you open the aperture on your lens, the more light that comes in! Think of the aperture as your camera's eye lid- the more open that eye lid is the more light your camera is going to see. Right? Right! For low light situations I will usually shoot at an aperture of 1.8 - 2.8, depending on the lens that I am using. Prime lenses can open even wider and can take you to 1.2. You do have to be extra careful with focusing at a wide open aperture however, because the wider the aperture, the more background that will be thrown out of focus.
2. Try a longer exposure.The longer your expose, the more light you let into your shot. Long exposures are great for shots where there is no movement being captured , OR if you want to show actual movement in your photograph. However, if you are shooting movement and do NOT want movement blur in your photo and you are holding your camera (as opposed to using a tripod), make sure to follow the 1/focal length or above rule. So for example, if your lens has a 50mm focal length, you do NOT want to set your shutter speed below 1/50 of a second or you will risk blurry photos. (And no, not even Photoshop can really save a blurry photo!)
I often use long exposures at wedding receptions to capture some of the details without losing the moody, low-lit ambience
3. Increase your ISO.The more you increase your camera's ISO, the more sensitive your camera's sensor will become to light. Be careful though, because the higher you crank up that ISO the more noise will be on your image. Thankfully, most professional camera bodies are pretty damn awesome with ISO performance! I can comfortably shoot at 3200 ISO with basically ZERO noise. However, on my old Canon 30D body, I couldn't shoot above 800 ISO without the image looking terribly shitty noisy.
Many times particular religious weddings prohibit the use of flash during the ceremony, (plus I prefer to use natural light whenever possible anyway!) so I will increase my ISO to get shots in dimly lit places like this:
4. Keep it steady.Especially if you are holding your camera by hand and using a slow shutter speed!
I recently shot a wedding inside of the KC Planetarium (the first ever wedding to be held there!) but the ceremony was literally pitch black with only the stage light and the "sky." Using a flash at most times was not an option because the flash would bounce off the planetarium ceiling, causing the beautiful "sky" to loose all detail by turning white. So I got shots like this by shooting at a slower shutter speed and holding the camera very steady.
5. Use an unexpected light source. Look for unexpected sources of light in the environment that you're shooting in and make it the subject! Maybe it's a little window, a lamp in the room or a cell phone. Unless you're shooting inside a pitch black hole (which would be a little creepy,) there has to be at least some light around! Also, if you are shooting in an area that is so dark that your camera is having a hard time focusing, you need to focus on something light first and then re-frame your image. You can also use a cell phone! For example, if I'm shooting in an area that is SUPER dark, I will set my camera's focus to manual, hold a lit up cell phone where I'd want my camera to focus, manually focus on the cell phone light and then shoot the image. (After moving the cell phone, of course!)
Here I am using a cheap $3-4 utility lamp from Home Depot as the sole source of light in both of these self portraits:
(You get mega points if you know what video game the above photo is inspired by!)
6. Try shooting a silhouette.These can be really fun and offer an interesting and different perspective! I wrote a whole post on how to photograph a silhouette right here.
7. Use a tripod.I almost never use a tripod except for when I'm outside shooting lightning using a SUPER slow shutter speed, or when I'm photographing a landscape scene in the darker hours. Yes ... I move around too much to use a tripod. They slow me down dag nabbit! But if you're not inpatient like me you should totally try using one.
8. Bring a light source.You can bounce your camera's flash (or off-camera flash) off of walls and ceilings, or you can even use a handheld LED light. Get creative. Hell, I've even used those cheap-o work lamps from Home Depot before!
Here I am using an off-camera flash in my otherwise pitch black apartment at night:
Basic Photoshop Tutorials Using The Eraser Tool
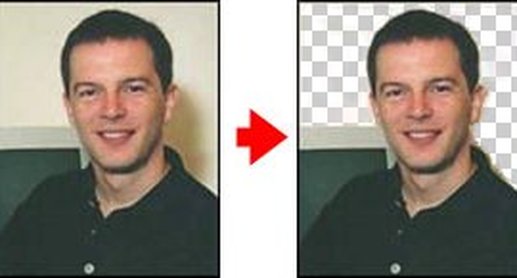
The Magic Eraser is often used to blast large areas that contain unwanted pixels. Remove the sky along with the detailed edges using the Background Eraser tool. Background Eraser tool helps you to remove background of any image.
This lets you know the pixels that are headed for deletion. if you hold the mouse button down and spray the eraser’s brush around the image you will be able to get rid of all the pixels of the same color.
The Magic Eraser is often used to blast large areas that contain unwanted pixels. It certainly can be effective if you want to get fast results, but it is less than subtle.
Here is the way that you can work with the Background Eraser tool to accomplish the above task. You can cut out the complex shapes easily using the Background Eraser. Now you may need to spend a little time fiddling with the options to get the most use of the tool when you are working on a complex project such as this one.
Some selection tools would not be able to handle the job because of the position of the crenelations and the arches of the towers. When you want to try to remove the sky that is hidden among all of that other stuff, this makes it very tricky.
Let’s say you want to isolate your image in your picture by removing the sky. The sky consists of edges that may prove difficult to work with. Remove the sky along with the detailed edges using the Background Eraser tool.
The Background Eraser is more versatile and gives you greater control over some of the more difficult tasks. If you are selecting intricately shaped objects, the Background Eraser may be the tool for the job.
Now, there are some kinds of selection jobs that work better with the Background Eraser than with the actual Magic Eraser.
Once, begin by selecting the tool from the toolbox and in the options bar you will want to set the Sampling option to. Sample a section of the blue sky by clicking and the
background swatch icon will change color.
This is one of the reasons that Photoshop is so great. This program provides the user with lots of selection tool choices. Each tool has its own options that can be
customized.
Pixels of other colors will not be removed as you spray around the edge of the building. if you want the best results you can tweak the Tolerance setting.
Here is the way that you can work with the Background Eraser tool to accomplish the above task. You can cut out the complex shapes easily using the Background Eraser. Now you may need to spend a little time fiddling with the options to get the most use of the tool when you are working on a complex project such as this one.
Have an object with edges you want to isolate? This is one way to use the Background Eraser tool.
To get any Photo editing service visit Clipping Path Lab http://www.clippingpathlab.com/
Ten Tips for Fabulous Waterfall Photography
Waterfalls present natural beauty that makes a great subject for landscape photos. The rushing water of a powerful waterfall or the gentle trickle of a smaller fall can lead to amazing photos that viewers will love. Although there are several famous waterfalls that are well known around the world, you don’t have to go searching very far to find a great subject for your own waterfall photography. Lesser-known falls can provide opportunities to get great photos and chances are there are a few waterfalls within driving distance of wherever you live.
1. Watch the Weather Forecast
Weather is always a factor for landscape and nature photographers, but weather can have an even bigger impact for photographing waterfalls as compared to some other subjects. Generally, waterfalls will not photograph well on bright, sunny days as the highlights in the water can be easily blown out and harsh glares and reflections present obstacles. Cloudy, overcast weather will usually produce better results and allow the colors of the landscape surrounding the waterfall to look better.
2. Know the Layout
Many waterfalls are surrounded by high rock walls or cliffs, and many will also have a lot of trees that block much of the incoming light. As an outdoor photographer you will, of course, want to work in the best light, which generally means in the hours around sunrise and sunset. However, when the sun is low in the sky the rock walls, cliffs, and trees surrounding the waterfall will have an even bigger impact on your photography. This isn’t necessarily a bad thing since you’ll generally want light that is softer rather than harsh.
Make an effort to get to know the layout of the waterfall that you will be shooting so you can anticipate how the lighting will be impacted when you plan to visit. If it is your first time visiting a particular you may need to do some research online to learn what you can about the surroundings of the area.
You’ll also want to be aware of the direction that the waterfall is facing, as it can have an impact on the lighting as well. If the waterfall is facing east or west you may want to avoid sunrise or sunset as the light shining directly on the waterfall will not be as pleasing as softer lighting.
3. Be Properly Equipped
When photographing waterfalls the most important piece of gear, aside from your camera and lens, will be your tripod. With the surrounding cliffs and trees blocking a lot of light you are likely to need a shutter speed that will require a tripod for a steady and sharp photo. Also, you may want to use slower shutter speeds to blur or soften the moving water.
If you plan to use slow shutter speeds or long exposures you may also want to have a neutral density filter that will reduce the amount of light reaching the senor. Getting the blurred look is popular with waterfalls, so having a good ND filter is helpful if this is your goal. However, you can often use a slow enough shutter speed that will soften the water even without an ND filter. You can use the lowest ISO that your camera will allow and a small aperture (like f/16 – f/22) to slow down the shutter speed enough to blur the water. Of course, all of the exposure settings that you’ll use and their impact on blurring the water will depend on the lighting conditions, but since many waterfalls are in darker areas you may not even need an ND filter for a soft blur.
A polarize is also a good filter to have on hand because you may want to cut down on reflection or glare coming off the water. And depending on how close you are to the falls and how much water is flowing you may want to protect your lens from mist by using a polarized or UV filter. It’s also a good idea to have some lens wipes, a microfiber cloth, and maybe a towel with you to keep you gear clean and dry in misty conditions.
4. Determine if the Sky Should Be a Part of Your Composition
One of the downsides to shooting on cloudy or overcast days is that you may be working with very boring skies. If the sky is not adding to your photo you can compose your shots to focus more closely on the waterfall itself and avoid having the sky in your composition at all. Depending on the fall and it’s surroundings you may have options for shooting it from head on, from the side, from above, and in some rare cases you can even get behind the falls.
5. Look for Foreground Interest
Including foreground interest in your compositions is a good practice with landscapes in general, but when photographing waterfalls it’s easy to get consumed by the falling water and forget about the possibility or the need for foreground interest. At many locations you can include rocks, fallen trees, autumn leaves, or winter ice for foreground interest. Getting these elements in your foreground is easier if you are shooting from the bottom of the falls. Obviously, you don’t need to include foreground elements in every photo, but it is one option.
6. Experiment with Different Shutter SpeedsOne of the most common questions about photographing waterfalls is what shutter speed should be used. Anytime you are photographing a scene that includes moving water your shutter speed choice will have a big impact on the end result. There is no shutter speed that will work well for all waterfall shots, but in general you may want to start with a shutter speed of 1-2 seconds for a soft blur and then work from there. In bright light a shutter speed that slow will overexposure your photos, but on an overcast day at a waterfall that has additional shade from tree cover and surrounding cliffs, shooting at 1-2 seconds may be possible without using a neutral density filter. View the results of your photo and adjust the exposure as needed.
If you want to freeze the water’s movement, which often works well with strong rushing falls, use a fast shutter speed and adjust as needed. If you really want to blur the movement of the water you may need to lengthen the shutter speed beyond two seconds.
7. Bracket Your ShotsUsing exposure bracketing will help you to ensure that you get a quality exposure, and it also gives you the option of creating an HDR image if you choose. HDR photos of waterfalls also tend to blur or soften the movement of the water due to the blending of multiple exposures.
In addition to using your bracketed exposures to create an automatically generated HDR image, you can also manually combine the exposures to get the best results. For example, the waterfall may be located in an area that is in deep shadow and if you expose for the falls it may overexpose some other areas of the photo. You can use multiple bracketed exposures and manually combine them using layers in Photoshop to get a balanced exposure.
8. Don’t Be Afraid to Get Close Sometimes to get the best shot you may need to get into the water (of course, only do this if you are prepared with the right clothes and gear). You may want to get a pair of waders that can be used for fishing so you can easily get closer. Also be sure that your tripod will be able to handle the conditions.
9. Protect Your Camera and Gear If you are getting up close and personal with the falls you will need to be extra careful about protecting your gear. In extreme conditions you may need some sort of rain gear to protect your camera. You’ll may also want to use a filter to protect your lens. You may want to avoid using an expensive filter that can get damaged.
10. Re-Visit in Different Seasons Just like other landscapes, waterfalls will look drastically different throughout the year. In the spring you may find lush growth and rushing water from melted runoff. In the fall you can capture beautiful autumn colors and fallen leaves on rocks and in the water. In the winter you may find ice and snow around the falls, and in some cases the falls may even totally freeze over. So make an effort to visit the same waterfalls at different times of the year and you’ll find that your photos can be quite different.
Street photography tips you need to capture
Street photography: Getting the perfect shot In street photography, there are many factors to consider when you’re capturing a scene. When I first started out, oftentimes I would catch my best shots out of pure luck. But looking back I realize it has more to do with timing than luck.
There’s a lot of waiting involved in photography. You may be waiting for someone to walk by so they don’t enter the frame as you press the shutter button. You may be waiting for that moment of stillness among the chaos or waiting for your unsuspecting subject to look up for that brief second. Observe, wait, capture. You learn to be patient as a photographer. The perfect moment can’t be rushed.
1. Look aboveWhen you’re exploring a new city you will find yourself looking up quite often. If you see a piece of architecture you admire consider shooting it from this point of view. Whether you’re centered underneath or viewing from an angle, it will result in an intriguing photo for sure. It’s also one of the easies to capture if you’re new to street photography.
This photo was taken while looking above at the Willis Tower (also known as the Sears Tower) in Chicago, IL. My goal was to express the enormity of this incredible and well-known building. I internally considered the perspective, the strong horizontal and vertical lines, and even the gradation of light.
2. Look belowThe opposite of above is well, below. This is a point of view not captured nearly as much as above as it takes a little more thought. You have to consider your location. Is there a stairway to the top of a building or a steep hill? Fortunately there are plenty highs and lows in most cities. The next time you’re up high, take a look at what you see below and create something new from it.
3. Across the streetOne of the best ways capture a building, or in this case marquee signage, is to shoot from across the street. Of course this depends on the type of lens you have too but most of the time it’s easiest to catch a spectacle like this in its entirety from a street over. Had I been on the same side of the building, I would not be able to get this shot.
This photo was taken across from the Chicago Theatre to capture the bright, sparkling signage.
4. AnglesI’m always looking for dynamic angles when scouting out signage. I personally find shooting things from a straight on angle to be uninspiring so I purposefully shoot at a diagonal angle like in this shot.
5. TexturesAnother things I’m looking out for when wondering a city are unique textures, abundant in urban settings. I loved how the Hard Rock Cafe logo looked painted on this brick wall in Seattle, Washington. I’m sure your city offers its own texture and street art too!
6. Foreground versus backgroundDon’t be afraid to let something get in the way. I purposefully captured these images of Vancouver’s Burrard Bridge by standing behind walls to achieve the dark framed edges shown here. In this case, it emphasizes the motion of those passing by on the bridge. It also creates an interesting gradation of darkness. Yes, this could be replicated in Photoshop but you want to capture everything in camera first, right? :) Use foreground and background creatively the next time you’ve found your focal point.
7. Capture a scene from afarWhile I love photography details up close to capture the unnoticed, I also know the importance of stepping and back and letting the whole scene in. A great way to capture San Francisco’s Ocean Beach is from the Cliff House. It shows just enough of those on the beach, the shore, the waves, the mountains, and the sky.
8. ReflectionsYou know window shopping? Well, usually when I’m looking through a window I’m thinking about how I can create some dreamy and abstract photo from it. It’s also a sneaky way to achieving the look of a double exposure.
9. Capture motion What would a city be without motion? This can be a little tricky to capture but it just takes practice! You’ll want to play around with the shutter speed on your camera to give just the right amount of camera blur you like. The faster the shutter speed, the more you “freeze” the scene (meaning everything is sharp and in focus, no motion). So the more you slow the shutter speed down, the more of an artistic blur you’ll catch in your moving subjects.
10. Lights and shadows Lighting is one of the single most important elements to consider in photography. (I wrote about this more in a tutorial on the golden hour here, so be sure to check that out)! Whether it’s the middle of the day or the sunlight is fading from the streets, there’s always bits of light and shadow you can use to create dynamic images.
While waiting to cross on Market Street in San Francisco I looked up and noticed the light shining on the sign and the windows from the building in the background. Be observant (and again, patient) and you will find these moments.
11. AbstractionAbstracting a scene comes fairly easy to me. I enjoy taking the ordinary and making it extraordinary. I want to force you to take a second look and wonder, what is that? How did she do that?
There are many ways to abstract a scene but one of the most straightforward ways to do so is to play with the focus on your camera when shooting bright city lights at night. This technique is referred to as bokeh photography. This photo is of the BC Place Stadium in Vancouver, BC. There’s plenty more of bokeh photography where that came from!
12. Never pass up those alleywaysIn San Francisco, there are no shortage of alleyways. While I don’t advise walking down them alone especially at night with a camera, I do encourage capturing them from afar. No two alleyways are the same.
13. FramingCreatively using frames within your street photography can be a great way to emphasize your focal point. The archways from the Burrard bridge framed the couple walking toward me in the image below.
14. PerspectiveStrong, directional lines can be powerful in your street photography, giving a sense of perspective or symmetry. Bridges and other architecture in cities offer plenty of lines, shapes, and perspectives. What unique perspectives of buildings in your city have you noticed and can share in your images?
15. Go where the view isEvery city has its spots with the best views to gaze from. I’ve spent years roaming San Francisco discovering these. One of my favorite places to see the city of San Francisco in one view is from Twin Peaks. At night, you can see the stream of lights on Market street from the Ferry Building, the bay and golden gate bridges.
16. PeopleAnd last but not least, people. While those passing by can sometimes get in the way of composing your shot, don’t forget they can add an unplanned element of surprise. The thing with strangers walking by is you have to be quick. They aren’t there to pose for you so you have to rely on your instincts to frame, focus, and capture these images.
Best way to get the photo retouching done
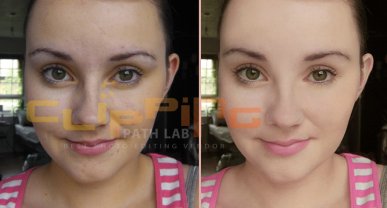
Retouching of any product or person photo can be done in different ways. Either one can do it thyself with the use of some photo editing or retouching application like adobe Photoshop, hire somebody to do photo retouching, or outsource the photo retouching job from some photo retouching service provider.
Which one is the best option depends on your unique situation. If you want only one or a couple photo editing here and there, you can get a free photo retouching tool downloading from the internet and nicely do it yourself. You just have to get familiar with the use of the software or tool for the first time you use it. Once you are well-known using the photo editing tool, you can have a photo retouched in minutes. More complex photos can take a little longer.
If you are in a photo editing company where it requires you to have photo retouching done one a normal basis, then you have to hire some in-house well graphic designer who can do the photo editing for you on a normal basis. You only have to do some math to observe if it is cost efficient for you to hire a full time graphic designer or a photo editing professional.
There is a different option for you is to outsource the whole image editing job to some photo editing service provider who can have the job done for you as your requirement. You can outsource the all your job locally from some local graphic designer or outsource from several outsource photo retouching service provider. If you hire someone locally he will give you better access to your hired resource, but it will most likely cost you a lot when compared from hiring an offshore Graphics Designing or photo retouching company.
Even if you want a handful of photo edited here and there, you can hire those offshore photo retouching service provider or photoshop professionals. If you have a lot of photo retouching needs, you will get a volume discount for the job. So try to negotiate with the any photo retouching company if you order in a large volume.
Source: http://www.clippingpathlab.com/graphics-design-blogs/
How to Photograph Parties
It’s so much fun planning parties for our kids…we put so much into it that we must make it a priority to get it documented somehow! This has been on my mind today as I’m planning my baby’s SECOND BIRTHDAY! It’s a couple days away still so I’ll use pictures from his first birthday in this post. I am writing with advice based from my personal experience on how to photograph parties.
10 tips on how to photograph parties1. Make it a two part deal.
Take your child out for a special “birthday session” a different day. Parties are busy and when you’re the host you probably won’t be able to document the way you’d be able to if your hands weren’t so full!
2. After you set aside a special time to photograph your child and document milestones, etc…let the party picture stress go by considering hiring someone to help take pictures.
If you are in business you can swap with a friend! If you aren’t a photographer you can barter another special talent that you have with a local photographer you know. Bartering works well for party pictures :)
3. Don’t forget the details!
However teeny tiny they may be…invites, the food, the cake, the party hats or decor…etc.
4. Document the guests.
This way they can remember who was there when they’re older and looking back at their pictures.
5. Capture the birthday boy or girl’s expressions and excitement.
6. Do cool things with cakes candles (lights off creates a dramatic feel when candles are lit).
We will do that this year! Last year my son was a little young for candles…
7. Think about perspective and get creative!
You can pull this off many ways (through composition, angle, lens choice). Obviously it depends on where the party is and what the circumstances are but typically my go-to party lens is my 35mm. I always change it up to get variety through out the party at least once and love to throw in a shot with my fish eye lens too just for fun :)
8. Remember to get in some of the pictures yourself.
I can’t tell you how many parties end and I wish I had been in a picture because I always wonder if my kids will think I wasn’t there when they look back on their party memories!
9. Create a book, album, or some type of keepsake to organize the birthdays through out the years.
There are so many different (and easy) ways to do this. Although I’d always wanted to create a picture album online after each party I never got around to it. I bought The Birthday Book online and it has helped me organize this information so much! And it only take a couple minutes after each party.
10. Don’t forget to put your camera down and enjoy (or if you were able to pull off number 2 from above then maybe you were able to enjoy the whole party and let someone else do the work!).
Top 5 Free Photo Editing Websites

Owning a blog means editing a lot of pictures and I’ve navigated my way around a few photo editing sites. The best thing about them: these are FREE photo editing sites. Not only are these sites good for bloggers, but they’re great for moms who want to brighten, filter or erase some blemishes on family photos before they’re printed and hanging on the wall. Here are my top 5 choices for free photo editing sites.
1. Canva
I LOVE Canva and it’s become the only tool I use to make images for Southern Savers. They have so many beautiful pictures to use as backgrounds that pull over from Unsplash.com. This is also a great site to make printables for your home. You can put your favorite scripture or quote in front of an image, print it out and hang it on your wall.
2. PicMonkey
Save
This used to be the site that I would always use, but now I mainly go to it to erase any unwanted background. I’ve found that it’s easy to use and has a lot of options for text fonts, overlays and editing options. Right now when you sign up, you can try a free 7 days of Royale (the upgraded version of the free site).
4. iPiccy
5. BeFunky
How to Sell Your Photos Online for More Cash with Less Work

Photography is big business these days. Webmasters and businesses use images for their websites and marketing materials. People purchase artwork for their homes. All of these photos need to come from somewhere. As a freelance photographer, you have numerous options to sell your photos online. And this can be a great way to create passive income that earns while you’re working on other things.What Kind of Photos Do People Want to Buy?Right now, one of the biggest consumers of online photography is bloggers and website owners. Every piece of content created from blog posts to social media updates needs an attractive image. Here are a few categories that are in demand.
Creating the Best Images Possible Let’s be frank. If your photos are not visually appealing, they aren’t going to sell. Here are a few tips to taking better photographs.
Sell Images OnlineThere are several websites that sell stock photos and vector images to webmasters and business owners. These photos can be sold over and over again providing long-term residual income.
Sell Your Photos on Tangible ItemsThere are also a number of websites that will allow customers to print your photos on everything from coffee mugs to canvas.
Don’t forget to market your available photos. Social networks, guest posting about photography and getting active in photography forums can all help.
You probably aren’t going to get rich selling photos online, but you can earn some extra cash passively. We all like that. Many estimates state sellers earn on average $1 per month for every image listed. That means if you have 100 images available for sale, you may be earning around $100 per month. More images = more money.
ShareShare How to Sell Your Photos Online for More Cash with Less Work
- Photos of people
- Photos of work situations (at the office, carpenter, steward, etc.)
- Photos of travel
- Photos of cities
- Close-up photos
- Photos of things (screws, medication, signs, books, computers, tools, bags, cables etc)
- Photos of nature
- Photos of animals
Creating the Best Images Possible Let’s be frank. If your photos are not visually appealing, they aren’t going to sell. Here are a few tips to taking better photographs.
- Have the right equipment. You aren’t going to get the quality you need for marketable images from your smartphone. A DSLR camera is a worthy investment for this line of business.
- A tripod is also a must-have. This will keep your camera steady while you’re shooting. Amazon even has some cool photography kits that come with everything from a quality DSLR camera to tripod to zoom lens.
- Data backup. You don’t want to lose all of your hard work should something catastrophic happen to your computer. Check out a service like Carbonite. Or, if you are an Amazon Prime member, you can store your photos online for free.
- A light tent can help you create awesome styled stock photos. They eliminate glare and soften light to create the perfect picture. Tabletop versions are also really inexpensive.
- If you need to take your photos on a larger surface that a tabletop, consider picking up some backdrops from Swanky Prints. These vinyl backdrops are freakin’ amazing. And many are reversible so you get double the bang for your buck.
Sell Images OnlineThere are several websites that sell stock photos and vector images to webmasters and business owners. These photos can be sold over and over again providing long-term residual income.
- Fotolia – Earn 20-63%. Exclusivity is not required though some rules apply to pricing once a certain rank is achieve. Payment is made via Money bookers or PayPal.
- Alamy – this site offers a 50% royalty and no exclusivity clause. Nice!
- Shutterstock – Contributors earn 20-30%. Payments are made monthly with a $75 minimum. Shutterstock does not insist on exclusivity. You are free to sell your stock elsewhere.
- Dreamstime – Earn 20-60% from each sale. Has an active community.
- iStockphoto – Contributors earn 15% from each download. Exclusive Contributors earn 22-45%. Payments can be requested up to twice per week by PayPal, Moneybookers or Payoneer Mastercard with a $100 minimum balance. Checks are mailed on the 15th and 30th.
- FreeDigitalPhotos.net – Keep 70% of your sales revenue. Payments are made via PayPal with a $10 minimum.
- Bigstock – Earn 30% from individual downloads and up to $0.38 royalty on subscriber sales. Payments are processed once per week upon request with a $30 minimum balance. Receive payment by check, PayPal or Moneybookers.
- Demand Media offers freelance positions to photographers. Payment is like clockwork twice per week. Rates will vary by assignment. These must be exclusive photos and you give up all rights to the work upon sale.
- Sell Them Yourself – There are some themes and software like PhotoShelter that will make selling your photos a breeze without ongoing fees or giving up a percentage of each sale.
Sell Your Photos on Tangible ItemsThere are also a number of websites that will allow customers to print your photos on everything from coffee mugs to canvas.
- Cafe Press offer several options for selling. List your creation on their site or set up your own shop. Regular listings earn you 8%. Payments are made monthly by check or PayPal with a $25 minimum.
- Redbubble is similar to Cafe Press in the items they sell. Contributors set their price, earning everything above the predetermined base price. Payments are sent by PayPal monthly with a $20 minimum for US contributors.
- Shutterfly –Pro Galleries run $99 to $199 per year plus 15% commission on each sale. Shutterfly does take care of customer service issues. Payments are made monthly by direct deposit.
- eBay and Etsy are also options for selling your photos online. Etsy even allows minors on the site provided they have a parent or legal guardian managing their account.
Don’t forget to market your available photos. Social networks, guest posting about photography and getting active in photography forums can all help.
You probably aren’t going to get rich selling photos online, but you can earn some extra cash passively. We all like that. Many estimates state sellers earn on average $1 per month for every image listed. That means if you have 100 images available for sale, you may be earning around $100 per month. More images = more money.
ShareShare How to Sell Your Photos Online for More Cash with Less Work
Tips for Better Sunset Photography

A beautiful sunset. A scene bathed in spectacular light –sunsets are a photographer’s dream come true, presenting a chance for some truly dramatic images.
But while sunsets present excellent photo opportunities, capturing the tremendous beauty of a sunset can be difficult! It’s hard to convey the complex range of colors, light, and beauty of a sunset, into a simple two-dimensional image. And then there is the issue with camera settings: often, what we see in-person, and what the camera renders as an image, are two entirely different things.
To combat these challenges, arm yourself with the tools that you need to create dynamic sunset images. Whether you’re just getting started with sunset photography, or looking to brush up on some technique, here are some tips that will get you on track.
Plan AheadWhile it’s true that stunning sunset images can be taken spur of the moment, planning ahead can give you an advantage. Scout out ideal locations ahead of time. Try to look for places that have a great vantage point, and interesting elements to include in your compositions.
Check the sunset times, and plan to be there early to set up and get ready. Plan to stick around long enough. Often, about 20 minutes after the sun dips below the horizon, the sky will light up in another beautiful display of vibrant colors. But many people pack up and leave before this ‘second sunset,’ missing out on this opportunity.
Also, be sure to keep an eye on the weather. If a storm is clearing, seize the opportunity and get ready to go capture the sunset. The dramatic colors after a storm and the dramatic light streaming through the clouds make for beautiful sunset images.
Camera Settings and Gear for SunsetsWhen left to its own devices, the camera will often render an image differently than we would like. Sunsets are a great opportunity to get out of auto mode, and use settings that will give you more control over your images.
The best sunset photos are ones that have strong compositions, so look for opportunities to create solid images by adding plenty of foreground interest. By taking the time to practice new techniques, and experimenting with different settings, you’ll soon have your own collection of dramatic sunset photos.
March 10, 2017Street photography tips you need to capture Street photography: Getting the perfect shot
In street photography, there are many factors to consider when you’re capturing a scene. When I first started out, oftentimes I would catch my best shots out of pure luck. But looking back I realize it has more to do with timing than luck.
There’s a lot of waiting involved in photography. You may be waiting for someone to walk by so they don’t enter the frame as you press the shutter button. You may be waiting for that moment of stillness among the chaos or waiting for your unsuspecting subject to look up for that brief second. Observe, wait, capture. You learn to be patient as a photographer. The perfect moment can’t be rushed.
1. Look aboveWhen you’re exploring a new city you will find yourself looking up quite often. If you see a piece of architecture you admire consider shooting it from this point of view. Whether you’re centered underneath or viewing from an angle, it will result in an intriguing photo for sure. It’s also one of the easies to capture if you’re new to street photography.
This photo was taken while looking above at the Willis Tower (also known as the Sears Tower) in Chicago, IL. My goal was to express the enormity of this incredible and well-known building. I internally considered the perspective, the strong horizontal and vertical lines, and even the gradation of light.
2. Look belowThe opposite of above is well, below. This is a point of view not captured nearly as much as above as it takes a little more thought. You have to consider your location. Is there a stairway to the top of a building or a steep hill? Fortunately there are plenty highs and lows in most cities. The next time you’re up high, take a look at what you see below and create something new from it.
3. Across the streetOne of the best ways capture a building, or in this case marquee signage, is to shoot from across the street. Of course this depends on the type of lens you have too but most of the time it’s easiest to catch a spectacle like this in its entirety from a street over. Had I been on the same side of the building, I would not be able to get this shot.
This photo was taken across from the Chicago Theatre to capture the bright, sparkling signage.
4. AnglesI’m always looking for dynamic angles when scouting out signage. I personally find shooting things from a straight on angle to be uninspiring so I purposefully shoot at a diagonal angle like in this shot.
5. TexturesAnother things I’m looking out for when wondering a city are unique textures, abundant in urban settings. I loved how the Hard Rock Cafe logo looked painted on this brick wall in Seattle, Washington. I’m sure your city offers its own texture and street art too!
6. Foreground versus backgroundDon’t be afraid to let something get in the way. I purposefully captured these images of Vancouver’s Burrard Bridge by standing behind walls to achieve the dark framed edges shown here. In this case, it emphasizes the motion of those passing by on the bridge. It also creates an interesting gradation of darkness. Yes, this could be replicated in Photoshop but you want to capture everything in camera first, right? Use foreground and background creatively the next time you’ve found your focal point.
7. Capture a scene from afarWhile I love photography details up close to capture the unnoticed, I also know the importance of stepping and back and letting the whole scene in. A great way to capture San Francisco’s Ocean Beach is from the Cliff House. It shows just enough of those on the beach, the shore, the waves, the mountains, and the sky.
8. ReflectionsYou know window shopping? Well, usually when I’m looking through a window I’m thinking about how I can create some dreamy and abstract photo from it. It’s also a sneaky way to achieving the look of a double exposure.
9. Capture motionWhat would a city be without motion? This can be a little tricky to capture but it just takes practice! You’ll want to play around with the shutter speed on your camera to give just the right amount of camera blur you like. The faster the shutter speed, the more you “freeze” the scene (meaning everything is sharp and in focus, no motion). So the more you slow the shutter speed down, the more of an artistic blur you’ll catch in your moving subjects.
10. Lights and shadows Lighting is one of the single most important elements to consider in photography. (I wrote about this more in a tutorial on the golden hour here, so be sure to check that out)! Whether it’s the middle of the day or the sunlight is fading from the streets, there’s always bits of light and shadow you can use to create dynamic images.
While waiting to cross on Market Street in San Francisco I looked up and noticed the light shining on the sign and the windows from the building in the background. Be observant (and again, patient) and you will find these moments.
11. AbstractionAbstracting a scene comes fairly easy to me. I enjoy taking the ordinary and making it extraordinary. I want to force you to take a second look and wonder, what is that? How did she do that?
There are many ways to abstract a scene but one of the most straightforward ways to do so is to play with the focus on your camera when shooting bright city lights at night. This technique is referred to as bokeh photography. This photo is of the BC Place Stadium in Vancouver, BC. There’s plenty more of bokeh photography where that came from!
12. Never pass up those alleywaysIn San Francisco, there are no shortage of alleyways. While I don’t advise walking down them alone especially at night with a camera, I do encourage capturing them from afar. No two alleyways are the same.
13. FramingCreatively using frames within your street photography can be a great way to emphasize your focal point. The archways from the Burrard bridge framed the couple walking toward me in the image below.
14. PerspectiveStrong, directional lines can be powerful in your street photography, giving a sense of perspective or symmetry. Bridges and other architecture in cities offer plenty of lines, shapes, and perspectives. What unique perspectives of buildings in your city have you noticed and can share in your images?
15. Go where the view isEvery city has its spots with the best views to gaze from. I’ve spent years roaming San Francisco discovering these. One of my favorite places to see the city of San Francisco in one view is from Twin Peaks. At night, you can see the stream of lights on Market street from the Ferry Building, the bay and golden gate bridges.
16. PeopleAnd last but not least, people. While those passing by can sometimes get in the way of composing your shot, don’t forget they can add an unplanned element of surprise. The thing with strangers walking by is you have to be quick. They aren’t there to pose for you so you have to rely on your instincts to frame, focus, and capture these images.
But while sunsets present excellent photo opportunities, capturing the tremendous beauty of a sunset can be difficult! It’s hard to convey the complex range of colors, light, and beauty of a sunset, into a simple two-dimensional image. And then there is the issue with camera settings: often, what we see in-person, and what the camera renders as an image, are two entirely different things.
To combat these challenges, arm yourself with the tools that you need to create dynamic sunset images. Whether you’re just getting started with sunset photography, or looking to brush up on some technique, here are some tips that will get you on track.
Plan AheadWhile it’s true that stunning sunset images can be taken spur of the moment, planning ahead can give you an advantage. Scout out ideal locations ahead of time. Try to look for places that have a great vantage point, and interesting elements to include in your compositions.
Check the sunset times, and plan to be there early to set up and get ready. Plan to stick around long enough. Often, about 20 minutes after the sun dips below the horizon, the sky will light up in another beautiful display of vibrant colors. But many people pack up and leave before this ‘second sunset,’ missing out on this opportunity.
Also, be sure to keep an eye on the weather. If a storm is clearing, seize the opportunity and get ready to go capture the sunset. The dramatic colors after a storm and the dramatic light streaming through the clouds make for beautiful sunset images.
Plan AheadWhile it’s true that stunning sunset images can be taken spur of the moment, planning ahead can give you an advantage. Scout out ideal locations ahead of time. Try to look for places that have a great vantage point, and interesting elements to include in your compositions.
Check the sunset times, and plan to be there early to set up and get ready. Plan to stick around long enough. Often, about 20 minutes after the sun dips below the horizon, the sky will light up in another beautiful display of vibrant colors. But many people pack up and leave before this ‘second sunset,’ missing out on this opportunity.
Also, be sure to keep an eye on the weather. If a storm is clearing, seize the opportunity and get ready to go capture the sunset. The dramatic colors after a storm and the dramatic light streaming through the clouds make for beautiful sunset images.
Camera Settings and Gear for SunsetsWhen left to its own devices, the camera will often render an image differently than we would like. Sunsets are a great opportunity to get out of auto mode, and use settings that will give you more control over your images.
- Set Your Shooting Mode: Aperture priority is a good choice when you want complete control over the depth of field in an image. Or choose shutter priority for absolute control over the exposure. And of course, try to shoot in the lowest ISO possible (ISO 100) to avoid grainy images.
- Experiment With Exposures: Switching into shutter priority mode allows you to start with a faster shutter speed, and work down into slower ones, allowing you to experiment with a number of different exposures. Clouds and water can especially benefit from a long exposure time, as the slow shutter speeds will render these elements as soft and streaky, with a painting-like quality. When shooting long exposures, be sure to use a tripod to steady the camera and reduce image blur.
- Opt for a Graduated Neutral Density (ND) Filter: While exposing for the sky will give you amazing colors, this can cause the foreground to be dark and underexposed. Consider using a graduated neutral density (ND) filter, which will help you to get the exposure just right.
- Set the White Balance: When shooting sunsets, you’re going to want to ditch the auto white balance. Instead, opt for ‘shade,’ which will help to draw beautiful warm golden hues out of the sunset. Shooting in RAW is always a good idea, since this will allow you to adjust the white balance in post processing.
- Use Different Focal Lengths: For sunset photography, a wide-angle lens is a great option. These lenses create more distance between the foreground and background elements, increasing the sense of depth in a photo, and helping the foreground elements to stand out. On the other hand, telephoto lenses cause elements in an image to appear more compressed, reducing the sense of depth in a photo. Opt for a telephoto lens if you want to focus in on isolated elements, or to make the sun look bigger in a scene.
The best sunset photos are ones that have strong compositions, so look for opportunities to create solid images by adding plenty of foreground interest. By taking the time to practice new techniques, and experimenting with different settings, you’ll soon have your own collection of dramatic sunset photos.
March 10, 2017Street photography tips you need to capture Street photography: Getting the perfect shot
In street photography, there are many factors to consider when you’re capturing a scene. When I first started out, oftentimes I would catch my best shots out of pure luck. But looking back I realize it has more to do with timing than luck.
There’s a lot of waiting involved in photography. You may be waiting for someone to walk by so they don’t enter the frame as you press the shutter button. You may be waiting for that moment of stillness among the chaos or waiting for your unsuspecting subject to look up for that brief second. Observe, wait, capture. You learn to be patient as a photographer. The perfect moment can’t be rushed.
1. Look aboveWhen you’re exploring a new city you will find yourself looking up quite often. If you see a piece of architecture you admire consider shooting it from this point of view. Whether you’re centered underneath or viewing from an angle, it will result in an intriguing photo for sure. It’s also one of the easies to capture if you’re new to street photography.
This photo was taken while looking above at the Willis Tower (also known as the Sears Tower) in Chicago, IL. My goal was to express the enormity of this incredible and well-known building. I internally considered the perspective, the strong horizontal and vertical lines, and even the gradation of light.
2. Look belowThe opposite of above is well, below. This is a point of view not captured nearly as much as above as it takes a little more thought. You have to consider your location. Is there a stairway to the top of a building or a steep hill? Fortunately there are plenty highs and lows in most cities. The next time you’re up high, take a look at what you see below and create something new from it.
3. Across the streetOne of the best ways capture a building, or in this case marquee signage, is to shoot from across the street. Of course this depends on the type of lens you have too but most of the time it’s easiest to catch a spectacle like this in its entirety from a street over. Had I been on the same side of the building, I would not be able to get this shot.
This photo was taken across from the Chicago Theatre to capture the bright, sparkling signage.
4. AnglesI’m always looking for dynamic angles when scouting out signage. I personally find shooting things from a straight on angle to be uninspiring so I purposefully shoot at a diagonal angle like in this shot.
5. TexturesAnother things I’m looking out for when wondering a city are unique textures, abundant in urban settings. I loved how the Hard Rock Cafe logo looked painted on this brick wall in Seattle, Washington. I’m sure your city offers its own texture and street art too!
6. Foreground versus backgroundDon’t be afraid to let something get in the way. I purposefully captured these images of Vancouver’s Burrard Bridge by standing behind walls to achieve the dark framed edges shown here. In this case, it emphasizes the motion of those passing by on the bridge. It also creates an interesting gradation of darkness. Yes, this could be replicated in Photoshop but you want to capture everything in camera first, right? Use foreground and background creatively the next time you’ve found your focal point.
7. Capture a scene from afarWhile I love photography details up close to capture the unnoticed, I also know the importance of stepping and back and letting the whole scene in. A great way to capture San Francisco’s Ocean Beach is from the Cliff House. It shows just enough of those on the beach, the shore, the waves, the mountains, and the sky.
8. ReflectionsYou know window shopping? Well, usually when I’m looking through a window I’m thinking about how I can create some dreamy and abstract photo from it. It’s also a sneaky way to achieving the look of a double exposure.
9. Capture motionWhat would a city be without motion? This can be a little tricky to capture but it just takes practice! You’ll want to play around with the shutter speed on your camera to give just the right amount of camera blur you like. The faster the shutter speed, the more you “freeze” the scene (meaning everything is sharp and in focus, no motion). So the more you slow the shutter speed down, the more of an artistic blur you’ll catch in your moving subjects.
10. Lights and shadows Lighting is one of the single most important elements to consider in photography. (I wrote about this more in a tutorial on the golden hour here, so be sure to check that out)! Whether it’s the middle of the day or the sunlight is fading from the streets, there’s always bits of light and shadow you can use to create dynamic images.
While waiting to cross on Market Street in San Francisco I looked up and noticed the light shining on the sign and the windows from the building in the background. Be observant (and again, patient) and you will find these moments.
11. AbstractionAbstracting a scene comes fairly easy to me. I enjoy taking the ordinary and making it extraordinary. I want to force you to take a second look and wonder, what is that? How did she do that?
There are many ways to abstract a scene but one of the most straightforward ways to do so is to play with the focus on your camera when shooting bright city lights at night. This technique is referred to as bokeh photography. This photo is of the BC Place Stadium in Vancouver, BC. There’s plenty more of bokeh photography where that came from!
12. Never pass up those alleywaysIn San Francisco, there are no shortage of alleyways. While I don’t advise walking down them alone especially at night with a camera, I do encourage capturing them from afar. No two alleyways are the same.
13. FramingCreatively using frames within your street photography can be a great way to emphasize your focal point. The archways from the Burrard bridge framed the couple walking toward me in the image below.
14. PerspectiveStrong, directional lines can be powerful in your street photography, giving a sense of perspective or symmetry. Bridges and other architecture in cities offer plenty of lines, shapes, and perspectives. What unique perspectives of buildings in your city have you noticed and can share in your images?
15. Go where the view isEvery city has its spots with the best views to gaze from. I’ve spent years roaming San Francisco discovering these. One of my favorite places to see the city of San Francisco in one view is from Twin Peaks. At night, you can see the stream of lights on Market street from the Ferry Building, the bay and golden gate bridges.
16. PeopleAnd last but not least, people. While those passing by can sometimes get in the way of composing your shot, don’t forget they can add an unplanned element of surprise. The thing with strangers walking by is you have to be quick. They aren’t there to pose for you so you have to rely on your instincts to frame, focus, and capture these images.
WHY AND WHEN YOU SHOULD OUTSOURCE PHOTO EDITING
I am sure you have heard this before, most likely you say the word once or twice however the idea that you need to outsource photo editing, nicely that simply seems interesting. I mean how may you be a professional photographer and outsource your photo editing, can it be even your job anymore???
I believe the concept of outsourcing photo editing is only one that is very difficult for most photographers to tell on their own that it is the best choice, but I am here to inform you, that at a certain point of your photography career, it most definitely is the right choice.
If you’ve ever read the “ (A business guide book)” it says about how the death of a running business is when the technician is always remain in controlling, and you need the entrepreneur and manager immediately to play equal roles. Whenever you” the professional photographer” spend all of your time sitting at a PC editing your photos, the technician is in control and consumes the time you could be doing management or entrepreneur work.
The time would be better keeping you out in the public, booking more clients, shooting more session, cooperating with other person of your community. Your energy has valuation, and there will come a point you will be actually controlling your business to come back by doing that method of work. There will be a point when your time holds a higher value than the price of paying to get done your edits by some other person else, true to say you will be protecting your business capital!
You have to consider 4 things if you outsource photo editing
You must know your style
You must have it pinned because if you are going to be outsourcing your job, you have to tell the Designers, company or a person how you want to get your job done. As well as being able to explain your editing and enhancing style is likewise something that it is best to feel comfortable doing and if you actually don’t realize how to answer this, then step back and take a look at your work some.
Get your SOOC pretty regular and structured
This specific goes along with the above mentioned. But In my opinion it’s really worth mentioning, it has been the experience, that even when you truly feel pretty well about your SOOC photos, once you begin to outsource, I could almost guarantee you that they can get even better, consistent in case you will. It really kind of takes place that way.
Match up your time
This specific next part is up to model as all of our lives are stuffed differently. But you should evaluate your time can be consumed in case that’s at the level in which you’re hoping it to generally be, maybe you would like an additional hour each day to spend together with your family. Have you ever run out of hours in any day of you? It is very time to butts when the range of sessions is a) regular and b) at a place where you have go out of time in order to ‘do-it-all. ’
Perhaps you don’t enjoy editing
Effectively this one may well throw anyone off, if you’ve received your style worked out and you’re rocking your current SOOC; perhaps be you’re not just a ‘professional’ maybe you’re taking pictures for YOU! But just like any other professional photographer, your time is actually precious and perhaps, just probably, you do not enjoy the editing. Yes, I believe even as the hobbyist, deciding to outsource is totally fair and fine.
Now do you need all 4 steps checked out off the list to decide for outsource your photo editing job? Not. I think 1 & two are essential to really make the switch but I think you actually either are in category 3 to 4, not necessarily equally.
Outsourcing isn’t a big frightening word which you avoid; also it shouldn’t become something a person takes gently either; however it is something which can make you happy. All in all you should feel great about your decision, own it and begin to doing many of other things you may be doing together with your time and company.
How to outsource your photo editing job
Best and dependent outsourcing company
There is a lot of outsourcing company in the world and you should get done your job from a reputed Photo editing service provider who can edit your photos as your requirement on time.
Clipping Path Lab is one of the best photos editing service provider in the world and you can get your job done perfectly because they have a huge number of expert graphics designer for designing and editing photos.
How to get Service from Clipping Path Lab (a photo editing company)
Clipping Path is providing their service through internet at low cost. And they supporting their clients 24 hour, so you can hire them and get done your photo editing, photo retouching, or any other photo editing service you need easily.
To hire you have just to shot images, and getting back to your home send them your newly captured images
So you can get your job done easily for this you have to visit their Website which is www.clippingpathlab.com .
Photoshop shortcuts to speed up Photo Editing
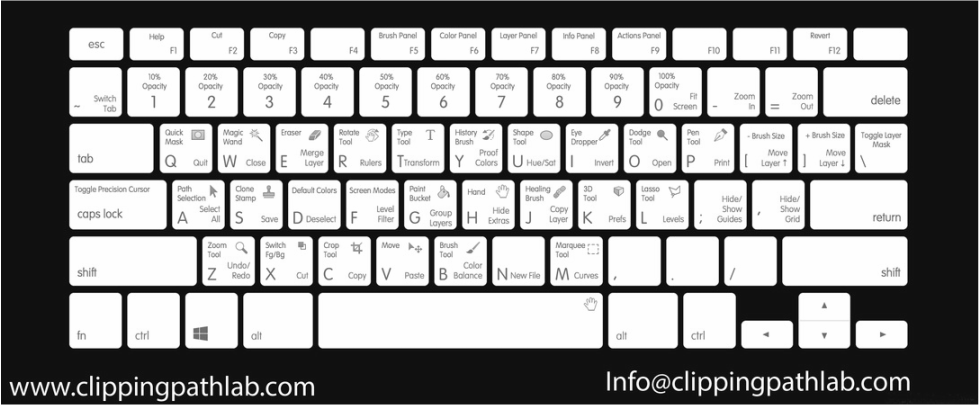
Whenever working in Photoshop, simple projects can become any hindrance on your workflow. To help out, we have a great choice of Photoshop shortcuts right here, all guaranteed to speed up your workflow once you get the hang of them.
We've also obtained free Photoshop actions to produce stunning results and some excellent Photoshop lessons to help you put them into practice.
Creating new layer
Start your hottest project with next to no time using this type of handy secret that promptly whips up a whole new layer in addition to dialog pack.
WINDOWS: Shift+Ctrl+N
MAC: Shift+Cmd+N
Creating new layer behind selected layer
Perfecting the new covering shortcut can be a doddle, so if you want to drop in a layer behind it, always use this shortcut.
WINDOWS: Cmd+New Layer Icon
MAC: Ctrl+New Layer icon
To Fill a layer
This specific command will fill an empty later with the current foreground or background color.
WINDOWS: Alt+Delete (foreground) or Ctrl+Delete (background)
MAC: Alt+Backspace (foreground) or Cmd+Backspace (background)
Flatten layers
Include a new, clear layer to your top within your stack, pick it and even use the on top of command to help flatten the exact layers with the image towards sharpen the results. This offers a squashed version belonging to the image for the new covering but departs the tiers intact overly.
WINDOWS: Ctrl+Alt+Shift+E
MAC: Cmd+Alt+Shift+E
Making visible layers
This command will help you merge all your existing layers to create one new layer. Beware! Once merged, they are extremely difficult to separate.
WINDOWS: Ctrl+Shift+E
MAC: Cmd+Shift+E
Stamp down selected layers
When you have selected your own personal layers, utilize this command for you to merge these products into one specific layer. Learn them joined as a completely new layer; purely add in typically the Shift changer. This is handy if you need to produce adjustments afterwards.
WINDOWS: Ctrl+Alt+E
MAC: Cmd+Alt+E
New layer via copy
You can use this command to create a new layer from an existing one. Sound complicated? Give it a go!
WINDOWS: Ctrl+J
MAC: Cmd+J
New layer via cut
Such as creating a completely new layer by copy, this particular command will make a new coating with the determined image spot in it, a common difference by using cut is it will eliminate the selected graphic portion within the original graphic.
WINDOWS: Ctrl+Shift+J
MAC: Cmd+Shift+J
To bring layer to top of stack
At this point, you can proceed your preferred stratum to the the top stack about images that you simply working with with Photoshop.
WINDOWS: Ctrl+Shift+]
MAC: Cmd+Shift+]
Send layer to bottom of stack
This really is plenty self-explanatory in that it lets you do exactly the same since the command earlier but in and the second direction.
WINDOWS: Ctrl+Shift+[
MAC: Cmd+Shift+[
To bring layer forward
This will help you to bring any selected image to the front.
WINDOWS: Ctrl+]
MAC: Cmd+]
Sending layer back
If you wish to change your mind, you can any time select the image and send it to the back of the pile!
WINDOWS: Ctrl+[
MAC: Cmd+[
Copy multiple layers
After drawing a selection you can use this command to take every layer into the clipping, rather than just the current layer selection.
WINDOWS: Shift+Ctrl+C
MAC: Shift+Cmd+C
Reselect
This is the best command for any of you that accidentally click away from a section. Pressing these buttons will get that section reselected.
WINDOWS: Ctrl+Shift+D
MAC: Cmd+Shift+D
Invert selection
Select the objects around an already pre-selected image, this way; you can easily work around your main focus without losing it!
WINDOWS: Ctrl+Shift+I
MAC: Cmd+Shift+I
Selecting all layers
It is a perfect command for those times when you want to get everything in sync.
WINDOWS: Ctrl+Alt+A
MAC: Cmd+Opt+A
Selecting bottom layer
By this way you can select the bottom layer in the layers panel.
WINDOWS: Alt+Comma(,)
MAC: Opt+Comma(,)
Selecting top layer
By this way one can select the top layer in the layers panel.
WINDOWS: Alt+Period(.)
MAC: Opt+Period(.)
Deselecting from the selection area
If you want to deselect a certain area sharpish, then click these keys.
WINDOWS: Alt+drag
MAC: Opt+drag
Deselecting all but the intersected area
If you don't need to deselect an area, you can use this shortcut to make sure you're clicking on what you want.
WINDOWS: Shift+Alt+drag
MAC: Shift+Opt+drag
Deselect the entire image
To deselect the entire image hit these keys.
WINDOWS: Ctrl+D
MAC: Cmd+D
Find the sizing handles
When you paste a layer or selection into any Photoshop image and it's bigger than the current image, it may be difficult to find the sizing handles. This command will select Transform and sizes the image inside the window so you can see the sizing handles.
WINDOWS: Ctrl+T, then Ctrl+0
MAC: Cmd+T, Cmd+0
Move a selection
To move a selection easily, you have to press and hold the Spacebar and continue to do so until the selection is in the correct place.
WINDOWS: Spacebar+Marquee Tool
MAC: Spacebar+Marquee Tool
Select individual channels
Choosing with Photoshop Channels can make removing a fancy object through the background easier than with some other tools. And taking advantage of this secret makes it actually simpler
WINDOWS: Ctrl+3(red),4(green),5(blue)
MAC: Cmd+3(red),4(green),5(blue)
Select a colour from an image
Whenever using a Photoshop brush, if you wish to sample a color from an picture, instead of clicking the Eyedropper tool, simply hold the Alt or Option key to switch temporarily. Then let go to return to the Brush tool.
WINDOWS: Alt+Brush Tool
MAC: Opt+Brush Tool
Increase/decrease brush size
For increasing/ decreasing Brush tool use these shortcuts
WINDOWS: ]/[
MAC: ]/[
FillI
f you want to fill the selection with the foreground colour or with a determined pattern, use this shortcut to get the job done easily.
WINDOWS: Shift+F5
MAC: Shift+F5
Increase/decrease brush hardness
For increasing/ decreasing Brush hardness use these shortcuts
WINDOWS: }/{
MAC: }/{
Previous/next brush
To save time and distractions by using these kinds of simple commands to swiftly move through the various brushes on offer.
WINDOWS: ,/.
MAC: ,/.
First/last brush
If you don't want to have gone through the entire array of Brushes on offer, use these shortcuts to go back to the start or end.
WINDOWS: </>
MAC: </>
Toggle airbrush option
Simulate spraying painting with Photoshop's airbrush tool using this helpful shortcut.
WINDOWS: Shift+Alt+P
MAC: Shift+Alt+P
Save for web & devices
Pretty self-explanatory but if you don’t want to drag your mouse onto a number of options, use this shortcut on your keyboard.
WINDOWS: Ctrl+Shift+Alt+S
MAC: Cmd+Shift+Opt+S
Close & go to bridge
To close use these shortcuts
WINDOWS: Ctrl+Shift+W
MAC: Cmd+Shift+W
Levels
When you will edit images, you'll be using the levels box regularly. Save yourself some time with this Photoshop shortcut.
WINDOWS: Ctrl+L
MAC: Command+L
Free Transform
This command opens the free transform tool for resizing, rotating, and skewing the image using a draggable outline.
WINDOWS: Cmd+T
MAC: Cmd+T
Curves
In this way you can quickly edit the Curves on your image.
WINDOWS: Ctrl+M
MAC: Cmd+M
Colour Balance
This is a great Photoshop shortcut to edit the Colour Balance of images.
MAC: Cmd+B
WINDOWS: Ctrl+B
Hue/Saturation
These two powerful Photoshop tools will help you in perfecting colour balance battle, and will decrease the amount of crossover.
WINDOWS: Ctrl+U
MAC: Cmd+U
Desaturate
You can convert your colour image to grayscale values, keeping the image in the same colour mode.
WINDOWS: Ctrl+Shift+U
MAC: Cmd+Shift+U
Quick image fixes
These tools are usually automatically improve your images.
Auto Tone
MAC: Shift+Cmd+L
WINDOWS: Shift+Ctrl+L
Auto Contrast
MAC: Opt+Shift+Cmd+L
WINDOWS: Alt+Shift+Ctrl+L
Auto Color
MAC: Shift+Cmd+B
WINDOWS: Shift+Ctrl+B
Lens correction
Use the lens correction filter for reducing the effect of barrel distortion, pincushion distortion.
MAC: Shift+Cmd+R
WINDOWS: Shift+Ctrl+R
Adaptive Wide Angle
Adaptive angle improved lenses can bring their particular particular effects, and Photoshop has a filtering for this. The particular Adaptive Vast Angle separate out can quickly help straighten lines that will appear curled in but, or photographs taken together with fish-eye and also wide viewpoint lenses.
MAC: Opt+Shift+Cmd+A
WINDOWS: Opt+Shift+Ctrl+A
Camera Raw Filter
MAC: Shift+Cmd+A
WINDOWS: Shift+Ctrl+A
Content aware scale
Scale your image to your preferred state with this quick shortcut.
MAC: Cmd+Shift+Opt+C
WINDOWS: Ctrl+Shift+Alt+C
Content-Aware Move
The most recent content-aware device in Photoshop CC allows you to move items around within a photograph, as well as it'll smartly fill in the gaps wherever they was previously.
MAC & WINDOWS: Shift+J
Create clipping mask
A nice way to keep shadows and shading where they belong, the clipping mask tool is basic but very useful tool.
MAC: Cmd+Opt+G
WINDOWS: Ctrl+Alt+G
Blending modes
Photoshop has a variety of blending modes for creating cool effects. You can use this command to cycle through each.
WINDOWS: Shift+plus(+) or minus(-)
MAC: Shift+plus(+) or minus(-)
Black and white dialog box
Speed up the way of converting colour photos to black and white with this great shortcut, which opens the black and white adjustment dialog box easily.
WINDOWS: Shift+Ctrl+Alt+B
MAC: Shift+Cmd+Alt+B
Change image size
Set up your image sizes with this simple shortcut.
WINDOWS: Ctrl+Alt+i
MAC: Cmd+Opt+i
Show/Hide Polygons
If you work with 3D assets, you can use this option to view the polygons that make up your 3D models.
Within Selection
MAC: Opt+Cmd+X
WINDOWS: Opt+Ctrl+X
Reveal All
WINDOWS: Opt+Shift+Ctrl+X
MAC: Opt+Shift+Cmd+X
Render
Once you completed your 3D model, you can use this option to create a final render and create the highest quality version for output to web, animation or print.
WINDOWS: Opt+Shift+Ctrl+R
MAC: Opt+Shift+Cmd+R
View actual pixels
Viewing a photo in Photoshop in actual pixels gives you the chance to see each pixel individually – Making sure your work is perfect.
MAC: Cmd+Opt+0
WINDOWS: Ctrl+Alt+0
Fit on screen
A nice way to view your work nicely on screen
MAC: Cmd+0
WINDOWS: Ctrl+0
Zoom in
If you want to see properly your image, zoom right in with this shortcut command.
MAC: Cmd+plus(+)
WINDOWS: Ctrl+plus(+)
Zoom out
You can zoom out your image with this zoom out command.
MAC: Cmd+Minus(-)
WINDOWS: Ctrl+Minus(-)
Increase/decrease size of selected text by 2pts
Experiment with text in Photoshop by using this shortcut to change its size by 2pts.
MAC: Cmd+Shift+>/<
WINDOWS: Ctrl+Shift+>/<
Increase/decrease size of selected text by 10pts
It works in the same as the command above but it's by 10pts this time.
MAC: Cmd+Option+Shift->/<
WINDOWS: Ctrl+Alt+Shift+>/<
Increase/decrease
kerning or trackingYou can adjust the space between your text in Photoshop with this handy shortcut.
MAC: Option+Right/Left Arrow
WINDOWS: Alt+Right/Left Arrow
Align text left/center/right
A nice way to experiment with the alignment of your text, this shortcut will help you to do it quickly.
MAC: Cmd-Shift-L/C/R
WINDOWS: Ctrl+Shift+L/C/R
Show/Hide selection on selected type
Speed up selecting elements on type with this easy shortcut.
MAC: Ctrl+H
WINDOWS: Ctrl+H
Learn the Basics of Photoshop in Under 25 Minutes
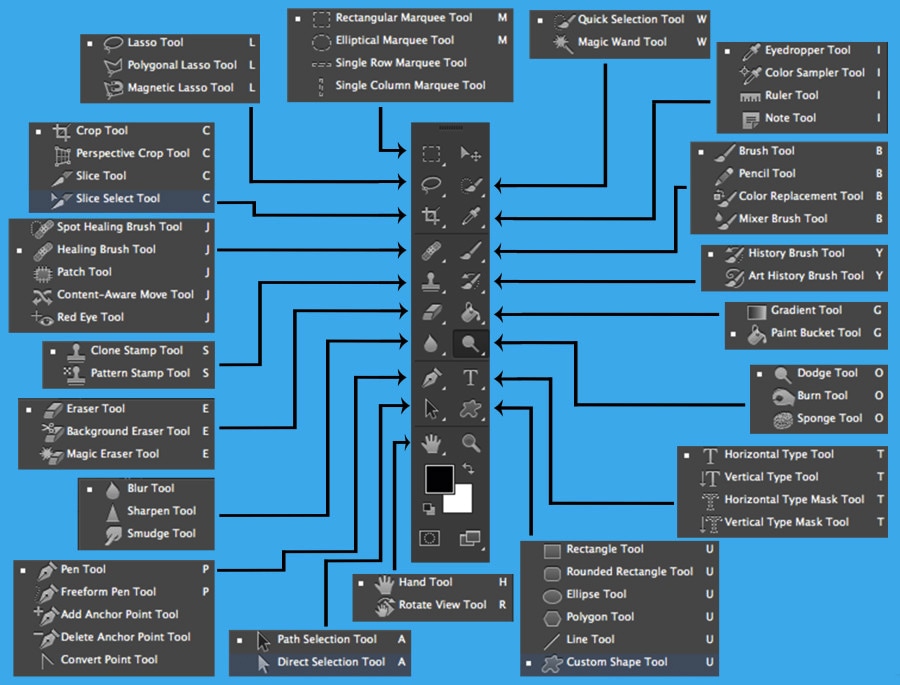
Photoshop is definitely an incredibly effective but additionally intimidating application. if you have desired to begin using photoshop but did not know how to start, i will be instructing you on the fundamentals all week lengthy.
the recording above is the lesson. it's short thinking about just how much it covers and lengthy thinking about it's on the web. within the video, we check out every tool within the plugin, your palettes around the right side from the screen, and just what you will find within the menus. below you will find a reference with this lesson. when the training are gone, we'll provide everything on this page along with a downloadable pdf that contains references for every lesson.
Wait! i don't have photoshop! i want to outsource!are you currently not presently a photoshop user? adobe provides a photoshop 30-day trial that you could download at this time also it provides you with sufficient time to understand how it operates. if you won't want to eventually purchase photoshop since it is too costly, a lot of what we are likely to discuss during these training will affect not just in photoshop but virtually the majority of the standard photo-editing and style tools you will find (pixelmator is a superb $30 alternative around the mac, and gimp is really a free, open-source mix-platform option). we have selected photoshop since it is probably the most generally used, but you are thanks for visiting follow along using other software too. today's lesson is fairly photoshop-specific, but because we move along you need to have the ability to use other software to complete the majority of what we should discuss.
If you want to outsource:
yes, visit http://clippingpathlab.com/ to outsource any photoshop clipping path or retouching services.
Ready? let's get started.
The toolbarwe are not going to have a look at each single tool but we will take a look at almost each of them. although this overview provides you with a concept of what each tool does, go end up a photograph and begin experimenting together.
Move tool (keyboard: v)
the move tool simply allows you progress objects inside a given layer round the photoshop canvas. for doing things, click anywhere around the canvas and drag. while you drag, the photoshop layer will move together with your mouse.
Marquee (keyboard: m)
the marquee allows you decide on area of the canvas inside a specific shape. automatically you receive a rectangular (or perfect square should you hold lower shift while choosing), but you may also select the same shape as an ellipse (or perhaps a perfect circle should you hold lower shift while choosing).
Lasso (keyboard: l)
the lasso is really a free-form selection tool that allows you drag round the canvas and choose anything the lasso'd area covers. in this particular tool additionally you have the polygonal lasso, which allows you develop a variety by clicking around around the canvas and creating points, and also the magnetic lasso, which fits identical to the regular lasso but tries to identify edges for you personally and instantly snap for them.
Magic wand (keyboard: w)
clicking a place using the magic wand will inform photoshop to decide on the place you visited and anything around it that's similar. it can be used a crude method to remove backgrounds from photos.
Crop tool (keyboard: c)
the crop tool can be used to (surprise!) crop your pictures. you are able to specify the precise size and constrain the crop tool to individuals proportions, or just crop to the size you want.
Eyedropper (keyboard: i)
the eyedropper tool allows clicking on any area of the canvas and sample the colour at this exact point. the eyedropper can change your foreground color to whatever color it sampled in the canvas.
Healing brush (keyboard: j)
the healing brush allows you sample area of the photograph and employ it to color over another part. once you are finished, photoshop will examine surrounding areas and then try to blend that which you colored along with the relaxation from the picture.
Paintbrush and pencil (keyboard: b)
the paintbrush is really a tool that emulates a paintbrush and also the pencil is really a tool that emulates a pencil. the paintbrush, however, could be set to many different types of brushes. you are able to paint with standard paintbrush and airbrush styles, or perhaps paint with leaves along with other shapes too.
Clone stamp (keyboard: s)
such as the healing brush, the clone stamp allows you sample area of the photograph and employ it to color over another part. using the clone stamp, however, there you have it. photoshop does not do anything whatsoever beyond painting an area on the new area.
History brush (keyboard: y)
a brief history brush allows you paint in time. photoshop monitors all of the moves you are making (well, 50 automatically) and also the history brush allows you paint yesteryear into the current photo. say you brightened in the entire photo however, you wanted to create a certain area seem like it did before you decide to brightened it, you are able to go ahead and take history brush and paint that area to recover the prior darkness.
Eraser tool (keyboard: e)
the erase tool is almost identical to the paintbrush, except it erases instead of paints.
Paint can and gradient tools (keyboard: g)
the paint can tool allows you complete a particular area using the current foreground color. the gradient tool will, automatically, produce a gradient that blends the foreground and background tool (if you can load and make preset gradients too, most of which use than two colors).
Blur, sharpen, and smudge tools (keyboard: none)
all of these tools behave like paintbrushes, but each one has another effect on the picture. the blur tool will blur the region in which you paint, the hone tool will hone it, and also the smudge tool will smudge the region all over the canvas. the smudge tool is extremely helpful in drawing for creating nicely mixed colors or creating wisps and smoke that you could supplment your photos.
Burn, dodge, and sponge tools (keyboard: o)
the burn, dodge, and sponge tools are paintbrush-like tools that manipulate light and color intensity. the burn tool could make areas inside your photo more dark. the dodge tool could make them lighter. the sponge tool can saturate or desaturate color in the region you paint by using it. they are all very helpful tools for photo touch ups.
Pen tool (keyboard: p)
the pen tool can be used for drawing vector graphics. it is also accustomed to create pathways you can use for a number of stuff that we'll go through inside a later lesson (although should you discover the shocking truth you can observe a kind path being produced).
Type tool (keyboard: t)
the kind tool allows you type flat. tools hidden underneath the horizontal type tool enables you to type up and down as well as create vertical and horizontal text masks.
Path tool (keyboard: a)
the path tool lets you move any created paths around. it's like the move tool, but for paths.
Shape tool (keyboard: u)
the form tool allows you develop vector rectangles, rounded rectangles, circles, polygons, lines, and custom shapes. these power tools are extremely helpful when creating or when designing shape masks for photos.
3D tools
fundamental essentials three dimensional tools. we are not really coping with three dimensional stuff during these training so that all you will need to know is the fact that these exist. if you are curious, this video provides you with a concept of what these power tools can perform.
Hand tool (keyboard: h)
the hands tool enables you to definitely click and drag round the photoshop canvas. when the entire canvas presently fits on screen, it will not do anything whatsoever. it is perfect for easily moving around when you are zoomed in, or perhaps a picture is straightforward too large to suit on screen at 100%.
Zoom tool (keyboard: z)
the zoom tool allows you zoom interior and exterior the photoshop canvas by hitting confirmed area. automatically, the zoom tool only zooms in. to zoom out, hold lower the choice key and employ the zoom tool while you would.
Color selection tools (keyboard: d for defaults, x to switch foreground and background colors)
these power tools allow you to manage the colours you are using. the colour on the top may be the foreground color and also the color at the spine may be the background color. the foreground color is exactly what your brushes uses. the backdrop color is exactly what is going to be used should you delete something in the background or extend it (although now, photoshop cs5 provides you with the choice of making use of your foreground color rather in certain conditions). the 2 smaller sized symbols up top are shortcut functions. the left one, showing a black square on the white-colored square, sets your foreground and background colors towards the defaults (keyboard: )). the double-headed curved arrow will swap your foreground and background color (keyboard: x). hitting either the foreground or background color brings up one picker so that you can set these to exactly the color you would like.
Palettes
palettes are things that the thing is sitting over around the right side of the screen. they allow you to definitely travel through your document, add adjustments, switch modes, along with other things.
Layers
the layers palette allows the thing is all of the layers inside your document. while you start understanding photoshop, you will find yourself within this palette greater than every other. it'll allow you to organize and arrange your layers, setblending modes, set visibility and opacity of layers, group and merge layers, and a lot of other neat things we'll find out about later on training.
Adjustments
your adjustments panel is to can certainly create and edit adjustment layers. adjustment layers are non-destructive image modifications affecting all of the layers below them and may be easily switched off and on. their most typical me is for color correction (namely the amount andcurves adjustments, but there are various types of adjustments you are able to perform that may significantly alter the feel of your image
Color
channelsthe colour channels palette enables you to consider the specific colors that comprise the picture. if you are in rgb mode you will get red, eco-friendly, and blue. these color channels will differ if you are inside a different color space (for example cmyk or lab). if you select a particular color, you will find you will be proven your image in numerous versions of black and white-colored. it is because each color funnel is only a monochromatic images representing the sunshine in every funnel (e.g. the red funnel is simply phone sore point inside your photo). switching between these different channels is helpful to make color funnel-specific touch ups, overall contrast enhancements, and for transforming your photo to black and white-colored inside a compelling way. this is talked about in depth inside a later lesson about color correction and photo enhancements.
Color picker
this palette will let you easily alter your foreground and background colors using sliders.
Color swatchesthe colour swatches palette is some pre-defined colors you are able to rapidly select from. you are able to load in a number of other pre-made piece of fabric collections or make your own, too.
History
a brief history palette allows you decide to go in time for you to undo any previous modifications. the conventional undo command (within the edit menu) only will toggle between undoing and redoing the most recent action carried out in your image. a brief history panel is to will go back much further (50 actions automatically).
Text
the written text palette, and also the paragraph palette below it, allow you to make a variety of alterations in any text you develop using the type tool. these choices are much like what you will find in short processing, but you may also specify such things as character width and spacing for helpful in design.
Menus
the majority of what you will find in photoshop's menus are available while using formerly talked about tools. nevertheless, we are likely to have a glance at some notable products in each one of the menus.
File
file, as always, handles opening, saving, and shutting procedures. for the finish of those training i will be considering your different saving options (namely save for web).
Edit
edit, as always, brings you copy, cut, and paste. in photoshop, it is also in which you transform layers and hang your color spaces.
Image
image brings you canvas and image adjustments, including destructive effects that you may have inside your adjustments palette. options within this menu are made to modify the image in general, although a lot of adjustments are put on merely a single layer.
Layer
layer allows you need to do everything that you can do within the layer palette having a couple of more options. this menu also allows you develop adjustment layers and wise objects (several layers treated like a single object).
Select
as the marquee and lasso tools will probably be your primary way of choosing things, the select menu will help you refine that selection or create entirely new choices according to certain criteria (for example color range and luminosity).
Filter
filter brings you an abundance of built-in (and, if installed, third-party) photoshop filters that may blur, hone, distort, modify your image (or layers from the image) in several and different ways. the easiest method to familiarize yourself with these filters would be to use them all. that may take some time, but it is fun to alter them and find out the things they're doing. i will be stepping into the specifics in subsequent training, only searching in a couple of generally helpful filters.
Analysis
analysis gives you measurement tools. you will see occasions when you really need these to make accurate modifications for your images. we won't be covering anything within this menu during these fundamental training.
3D
as formerly noted, we are not covering three dimensional. if you choose to find out more about three dimensional later, you might want to explore this menu by yourself sooner or later.
View
view gives you various view options, allows you hide and show line guides you've produced (see video to have an example), making photoshop snap (or otherwise snap) to corners, edges, and also to the grid around the canvas. viewing of the invisible grid may also be switched off and on within the view menu.
Window
window allows you hide and show certain home windows and palettes. you may also arrange your photoshop home windows and palettes nevertheless, you want and save them like a window preset.
that's all for today! in the next lesson we'll be learning about color correction, touch-ups, and photo enhancement.
you can contact abu fateh, the author of this post, at [email protected]. you can also hire him on upwork or follow facebook for creative writing.
Best Photo Retouching Service
Photo retouching and restoration is used by virtually all professional photographers. It adds a professional look that has so much more to offer than the original. We are skilled in digital photo retouching, photo editing and restoration.
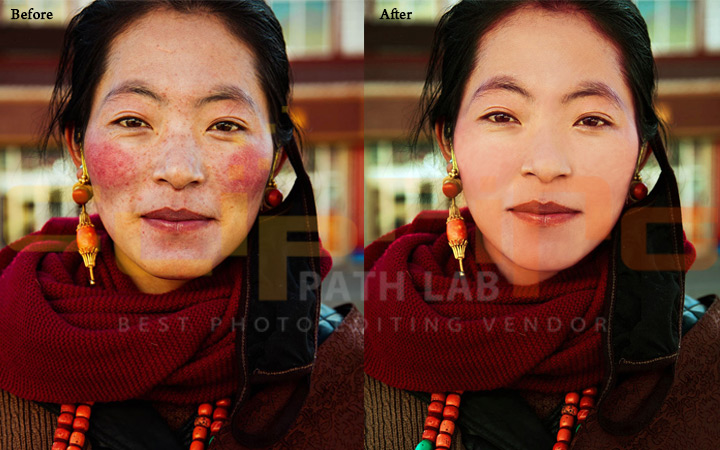
In focus on photo retouching and restoration are a professional, digital photo editing service. With more than 10 years of experience, we offer a competitively priced, highly skilled digital photo retouching service
EDITING SERVICE WE PROVIDE IN PHOTO RETOUCHING
Clipping Path Lab www.clippingpathlab.com Email: [email protected]
EDITING SERVICE WE PROVIDE IN PHOTO RETOUCHING
- Starting from basic retouching, bad acne and belmishes retouching and stray hair, skin highlighting
- Removal with color improvement to be done in your Photo, or even body and face photo slimming
- Age reduction look with removing wrinkles, resizing and improving lips, removing and adding people.
- Adding/ enhancing eyelashes and eyebrows to make
A glamour with make up editing - Ending with glitz pageant retouching and models high end retouch or old photo restoration
- Any type of photo editing needed, and Photo fixing
- We have professional and expert designer
- We will edit your photo until you are satisfied as your requirement
- Budget friendly prices starting at 29 cents per photo
- We will deliver your photo in time
- Honesty and clients sanctification are always before everything else
Clipping Path Lab www.clippingpathlab.com Email: [email protected]
Photo Color Correction Services
Image colorization is really a process of including color through grey range to black and white image. Image colorization as well as photo color correction needs skillful experts to complete the actual tedious, costly and time-consuming task.
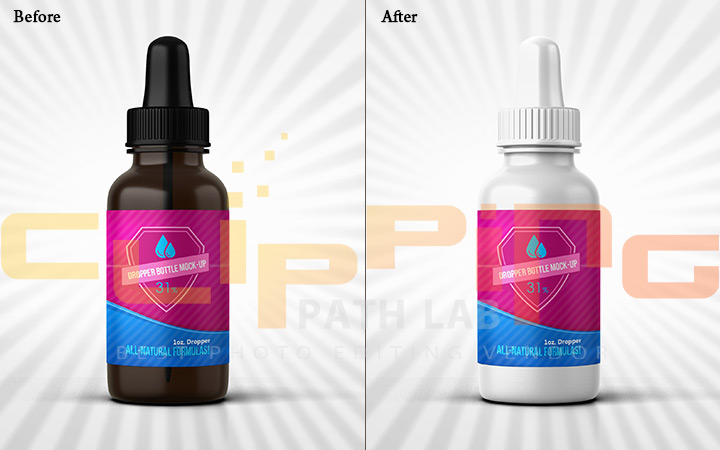
Our own experienced specialists ready to provide top quality picture colorization, picture recolor, photograph color modification or eliminate unnecessary synthetic colors from the photos based on your needs. Photo colorization and also photo shade correction costs depend on the particular complexity from the image function so you can deliver us your own sample with regard to price quotation. Clipping Style guarantee high quality service at most of the competitive rates with fast turnaround period. We can ensure that you will get your current desirable cost rate coming from us.
To get high quality color correction service Click here
Clipping Path Lab
http://clippingpathlab.com/
Email: [email protected]
To get high quality color correction service Click here
Clipping Path Lab
http://clippingpathlab.com/
Email: [email protected]
Image Masking Service
Preparing a clipping masks around objects that have confused or unclear edges can create good results which are poor. Our first aim at Clipping Path Lab to ensure that all picture you send us and we finish your picture to most figurative standards. So, we provide the best masking service for your picture that are not appropriate for a standard cutting path instructions delivering very good results to buyers who be expecting nothing significantly less. Our experienced graphic designers make use of the latest Image masking processes to remove background from pictures such as tresses or the leaves on trees and shrubs, resulting in razor-sharp and sleek edges which look regularly professional. Set up image you need to use is placed against the nearly all detailed track record of black or obliquity colours, we can easily separate the item from the foreground image though maintaining high-quality and a great level of depth.
In spite of the level of summarize complexity, the skilled graphics designers can easily surmount just about all problems to supply a exceptional result. We all pride themselves on creating our way of the task at hand, rather than continuous to apply common techniques to an image regardless of what it truly is. Each of our graphics specialist operatives possesses a particular specialization and consistently build on this skills basic to ensure they are really a expert of their hobby. As such, it is possible to rest assured your image masking covering up needs will probably be tackled by the consummate specialist with a amount of experience incomparable within the just offshore graphic business sector.
Doing work closely with your clients, always we try to make sure the end result is the better possible image for the situation in which it can be used. Personally masking photos is a professional, detailed and also labour extensive process – but is undoubtedly worth your time and effort it requires. We are delivering hand made image masking services for quite long time and understand complexities engaged. Moreover, all of us realise that a chain is barely as robust as its smallest link and for that reason even the littlest error manufactured whilst utilizing a Photoshop masking process will spoil the entire outcome. The work of each and every skilled designers, effectual is vetted via a strenuous quality handle process to ensure we get that right first-time, every time.
To get best clipping path service and image masking service click here
The Best Neck Joint / Ghost Mannequin Service
What is Neck Joint Service/ Ghost Mannequin?
Neck joint Service or ghost mannequin service is important terms for garment industry owners, Magazine business owners or professional photographers. This term is also known as Combo, Montage that is related with garments products. Photographers who take pictures of ghost mannequin, they might popular with these types of terms.
Neck joint Service or ghost mannequin service is important terms for garment industry owners, Magazine business owners or professional photographers. This term is also known as Combo, Montage that is related with garments products. Photographers who take pictures of ghost mannequin, they might popular with these types of terms.
Neck Joint/ Ghost Mannequin Service experts:
Neck Joint service or ghost mannequin removal service is our most regular work that we deliver from Clipping Path Lab. Our neck joint service experts always keep their eyes active on color match, size match, and design match etc to make the image more realistic and attractive after the total procedure is done. We serve neck joint or mannequin removal services with professional designers who are experienced for several years.
Who Need Neck Joint Service?
Garments buying house, Magazine business owners, online shop owners, Photographers need this mannequin removal service to enhance a product with better appearance and to show the product neck joint properly.
Why Neck Joint Service:
At that time the inner side of the cloth remains invisible when photographers take photos of a cloth wearing it on a mannequin. To make the product inner part visible and to remove the mannequin from the photo they take another picture of products inner part. And then neck joining or ghost mannequin’s services are requested from professional Photo editors or you can request a quote.
Products for Neck Joint Service:
Any type of garment t-shirts, lady t-shirts, shirts, pants, trousers, shoes, cap, cargo pants, jackets, girl jacket, down jacket, coats, jerseys, polo shirt, necktie, party dress, party costume, sweater, women skirt, work wear, prom dress, trousers, children cloth, hoody, sport shoe, lingerie, lady belt, jean and all sort of available products.
Neck Joint service or ghost mannequin removal service is our most regular work that we deliver. We serve neck joint or mannequin removal services with professional designers who are experienced for several years.
Neck joint Service or ghost mannequin service is important terms for garment industry owners, Magazine business owners or professional photographers. And then neck joining or ghost mannequin’s services are requested from professional Photo editors or you can request a quote.
Try us for best Ghost mannequin Removal
Clipping Path Lab
http://www.clippingpathlab.com
Email: [email protected]
Photo Manipulation Service
Photo Manipulation Photo manipulation is the method to edit an image in order to develop illusion or deception in images. Photo manipulation can be done through analog and digital way. Photo manipulation helps to enhance and improve the quality of an ordinary photo to an amazing photo. Use of cultural impact and ethical concerns has made photo manipulation as an interesting application rather than the technical process and the skills included. Photo manipulation is an art where output image improves the primary image. One can use this to extract the bad composing elements, add more interest, new color to a black and white photo. Photo manipulation could be used to create promotional shots for businesses.
Photo Manipulation ServiceThe very best sample of our Image manipulation service is neck joint of clothing item on mannequin. Our approach for image processing method like, Clipping path, Photo retouching, Image masking, Image manipulation, Photo enhancement, Image shading and Raster to Vector Image etc. We use unique and the latest technologies which enable us to deliver the greatest levels of data quality, accuracy in quick turnaround time. Image/Photo manipulation is one of the ways of image processing with in which we can develop the high quality of the image.
Web: http://clippingpathlab.com/ Email: [email protected]
Web: http://clippingpathlab.com/ Email: [email protected]
Remove Background Service_
Background removal service is one style of techniques for removing or extracting the real track record of an image or cutout the background with the image and next digging them into a unique appearance or simply background. Clipping Path Lab manufactures hard and also fine edges of the picture Background. Removing background is a pretty and the best technological innovation utilized to ensure the surface of the historical past of a picture. Especially we prepare images for your product in an e-commerce web-page. Removing background of a photo primarily transforms the complete photograph look.
E-commerce websites, company brochures, photos of functions, print media, builder’s brochures, and magazines all need graphic processing expert services of various types. Now a day, the favorite and noticeable requirement of client is having designed with eye-catching aesthetic using ideal background. Now, every image cannot be usually taken on a perfect background that the buyers can use. Therefore, in that case, every client needs background remove service and Clipping Path Lab provide background removal service for every client at a low cost. We can remove background of your all pictures as your requirement.
There are a lot of applications of photo editing and remove background but in Clipping Path Lab we use the best photo editing software for photo editing, removing background and clipping path service.
If any clients need the best clipping path and background removal service he/she should contact with us. Try us for a free trial
Email us: [email protected] Web : http://clippingpathlab.com/
Basic Photoshop Tutorials Using The Eraser Tool
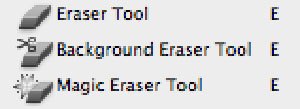
The Magic Eraser is often used to blast large areas that contain unwanted pixels. Remove the sky along with the detailed edges using the Background Eraser tool. Background Eraser tool helps you to remove background of any image.
This lets you know the pixels that are headed for deletion. if you hold the mouse button down and spray the eraser’s brush around the image you will be able to get rid of all the pixels of the same color.
The Magic Eraser is often used to blast large areas that contain unwanted pixels. It certainly can be effective if you want to get fast results, but it is less than subtle.
Here is the way that you can work with the Background Eraser tool to accomplish the above task. You can cut out the complex shapes easily using the Background Eraser. Now you may need to spend a little time fiddling with the options to get the most use of the tool when you are working on a complex project such as this one.
Some selection tools would not be able to handle the job because of the position of the crenulations and the arches of the towers. When you want to try to remove the sky that is hidden among all of that other stuff, this makes it very tricky.
Let’s say you want to isolate your image in your picture by removing the sky. The sky consists of edges that may prove difficult to work with. Remove the sky along with the detailed edges using the Background Eraser tool.
The Background Eraser is more versatile and gives you greater control over some of the more difficult tasks. If you are selecting intricately shaped objects, the Background Eraser may be the tool for the job.
Now, there are some kinds of selection jobs that work better with the Background Eraser than with the actual Magic Eraser.
Once, begin by selecting the tool from the toolbox and in the options bar you will want to set the Sampling option to. Sample a section of the blue sky by clicking and the
background swatch icon will change color.
This is one of the reasons that Photoshop is so great. This program provides the user with lots of selection tool choices. Each tool has its own options that can be
customized.
Pixels of other colors will not be removed as you spray around the edge of the building. if you want the best results you can tweak the Tolerance setting.
Here is the way that you can work with the Background Eraser tool to accomplish the above task. You can cut out the complex shapes easily using the Background Eraser. Now you may need to spend a little time fiddling with the options to get the most use of the tool when you are working on a complex project such as this one.
Have an object with edges you want to isolate? This is one way to use the Background Eraser tool.
To get any Photo editing service visit Clipping Path Lab
_Photo Retouching Services & Photo Editing Services
Photographs might be smashed or appeared weird by an abundance of uncertain instances. Photos captured by photography lovers are unable to always be best to present.

And we often are inclined to demonstrate our priceless photograph or images with a little bit more editing or decoration. In Image Editing, this technique is termed Photo Retouching and Restoration. The charming work includes sky-importance in photography Enterprise, Web or Marketing reason.
Photographs may be smashed or appeared weird by an abundance of unpredictable instances. Photos captured by taking photographs enthusiasts are unable to always be actually best to present.
Our excellent Graphics Designers put a painstaking effort with utter creativity to perform in your image retouching and restoration in Photoshop, photo touch up with every detail. Our Photo Retouching and restoration service will make your images more vivid, lively and good-looking!
“Clipping Path Lab” an outsourcing photo editing services provider including remove image background in United state, will give you to get our brilliant Photo Retouching and restoration service in more affordable budget and extremely fast turnaround time. Don’t think twice to knock us whenever you want when there is large quantity snapshot or product or service photographs to be retouched or recovered for better presentation.
Clipping Path Lab will get started on a maneuver to bring back your jumbled or shattered images into appealing yields. For best Photo retouching service visit here
Shadow Making service
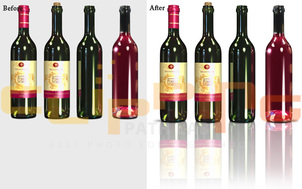
Shadow making of an image can double the beauty of an image and make natural essence to it, that’s why you’ll find shadowing very common and much-practiced image manipulation method. In e-commerce site shadowing is needed so frequently to get natural mood to the products.
We basically deal with two types of image shadowing- drop shadow and reflection shadow and for both of the services we have cost-effective packages for you. Because our highly professional graphics designer use the latest software’s for making shadow the images our clients give to us. Our graphics designers are also expert is different graphics designing service such as
Clipping Path Lab
www.clippingpathlab.com
Email: [email protected]
- Clipping Path Service
- Remove Background,
- Photo Retouching,
- Colorization,
- Ghost Mannequin,
- neck joint,
- Image Masking services
Clipping Path Lab
www.clippingpathlab.com
Email: [email protected]
What is masking ?
Layers area unit most likely the only most significant addition to Photoshop since the first version, however layer masks area unit a detailed second. I’d posit that till you completely perceive however and why to use masks, you simply don’t perceive the act of Photoshop.
The term “mask” isn’t now apprehensive to somebody outside the realm of graphic style. At its simplest definition a mask could be thanks to apply one thing to a really specific portion of a picture.
There are unit 2 primary kinds of masks: clipping masks and layer masks. These 2 tools area unit closely connected in idea, however terribly completely different in application. Let’s begin by discussing layers masks, that area unit typically what folk area unit is touching on when you hear them discuss Photoshop masking.
Kinds of Image masking:-
To sum up, there are 2 primary sorts of masks in Photoshop: layer masks and clipping masks. Layer masks use values of grey to assign levels of transparency to specific parts of a layer or cluster of layers whereas clipping masks use the transparency of 1 layer to outline that of a unique layer or cluster of layers.
Also, while masking in easy in construct, the particular art takes wide time, education and apply to master. Leave a comment below and allow us to apprehend if you learned something from the data on top of. Also be certain to share any distinctive masking techniques or tricks you may have!
Also, while masking in easy in construct, the particular art takes wide time, education and apply to master. Leave a comment below and allow us to apprehend if you learned something from the data on top of. Also be certain to share any distinctive masking techniques or tricks you may have!
For the best Image masking service you have to find the best photo editing Company.
Clipping Path Lab is a well reputed image editing company based in Bangladesh. We are offering you the BEST and QUALITY image editing service at very low cost. Our clients are always 100% satisfied since we have started our services. We are best from others because;
We are best from others because;
*** We guaranteed you for 100% satisfaction.
*** We will never ask you payment until we get satisfaction ensure from you.
*** On time delivery (We never crossed the deadline).
*** We are able to process huge capacity of images! (Bulk image processing)
*** 100% image security. (For that we make a written agreement about image security
(NDA)) Our Clipping Path Starting Price $0.29 USD
Do you need Clipping Path service? You can visit us for your clipping path service. We are the best for this service, and best quality is our commitment.
Remove Background, Retouching and Clipping Path Service
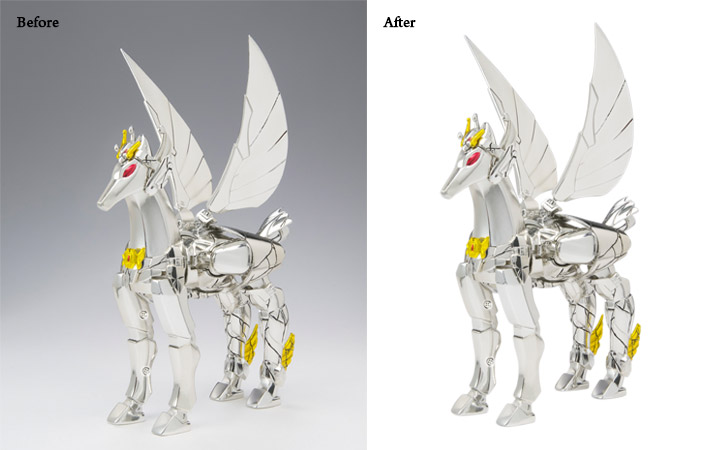

What is Clipping Path?
Clipping Path is a technique for removing the background of an image. To say more simply, clipping path is the process of making an outline through the edge of an image that allows you to remove the image from its original background. It is much like cutting a picture from a magazine with scissors. It gives an image with a hard and fine edge that helps you to blend it with remove background. Clipping path is also referred to as a ‘closed vector path’. Once clipping path is applied within an image, a selection is made and you can easily avoid for remove everything outside that border or you can take your selected portion to a whole different background. So, anything you don’t want to appear on the final image can be removed.
How we tend to produce Clipping Path?
Adobe Photoshop, creative person, Fireworks, CorelDraw, Quark Xpress etc are widespread package to make Path for any images; largely used package is Adobe Photoshop. Clipping Path service creates a define round the object that has to be cutout from the remainder of the pixels or areas. In Adobe Photoshop, the methods are drawn with Pen tool then the Photoshop Path is saved as Clipping Path with desired Flatness. We tend to produce Photoshop path to any forms of pictures adding variable quality levels as and once needed.
Who wants Photoshop Clipping Path?
In today's world, several people and corporations would like clipping path service, particularly World Health Organization are concerned at intervals photography, designing, advertising and printing industries. as an example, a catalog company typically uses many pictures in their catalog and that they are presumably to get rid of the background of their product photos before they place them into the layout. Similarly, an internet development company has to publish photos within the web site wherever they have to use clipping path to drop out background.
CLIPPING PATH LAB IS DELIVERING THE FOLLOWING PHOTOSHOP CLIPPING PATH SERVICES:
Simple/Basic Clipping Path
Compound Clipping Path
Complex Clipping Path
Super Complex Clipping Path
GET AFFORDABLE CLIPPING PATH SERVICES FOR:
• Clipping Path service (Multiple Clipping)
• Remove Background & Resizing/Cropping
• Shadow making (Original, Drop, Reflection/Mirror Shadow)
• Photo Retouching ( Headshots, Jewelry and Products Photo Retouching )
• Color Correction
• Post Production
• Photo Masking (Alpha channel, Layer Masking, Transparency Masking)
• Neck Joint/ Ghost Mannequin Effect/Combo/inclip
• Photo Manipulation
• Raster to Vector Conversion
Find Us on facebook.com: https://www.facebook.com/ClippingPathLab
CONTACT US
visit: www.clippingpathlab.com
email: [email protected]
We promise, we’ll get back to you shortly!
Phone: (713) 726 6184
email: [email protected]
We promise, we’ll get back to you shortly!
Phone: (713) 726 6184
Clipping Path Tutorial
Step -1 Open
the file which you want to clip path in Photoshop
From the tool box, you have to select the “Pen tool” (Shortcut key: Ctrl+”p”)
Pen tool is shown on the right side
Pen tool is shown on the right side
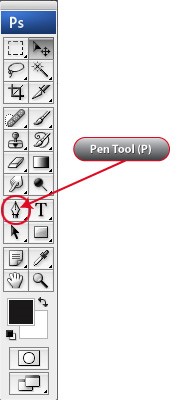
Step -2
Click on the side of the element you would like to cut out inside the image, release the button of the mouse. From a particular distance, click once again on the side and this time hold and drag your mouse pointer. Once you see outline is strictly on the side of the image, unleash the mouse. Continue doing same method till you finish up at the purpose wherever you started your path. When you will see the point of starting, you should click on it for closing the path. You have done outside path only. Now see look at the image below
Click on the side of the element you would like to cut out inside the image, release the button of the mouse. From a particular distance, click once again on the side and this time hold and drag your mouse pointer. Once you see outline is strictly on the side of the image, unleash the mouse. Continue doing same method till you finish up at the purpose wherever you started your path. When you will see the point of starting, you should click on it for closing the path. You have done outside path only. Now see look at the image below
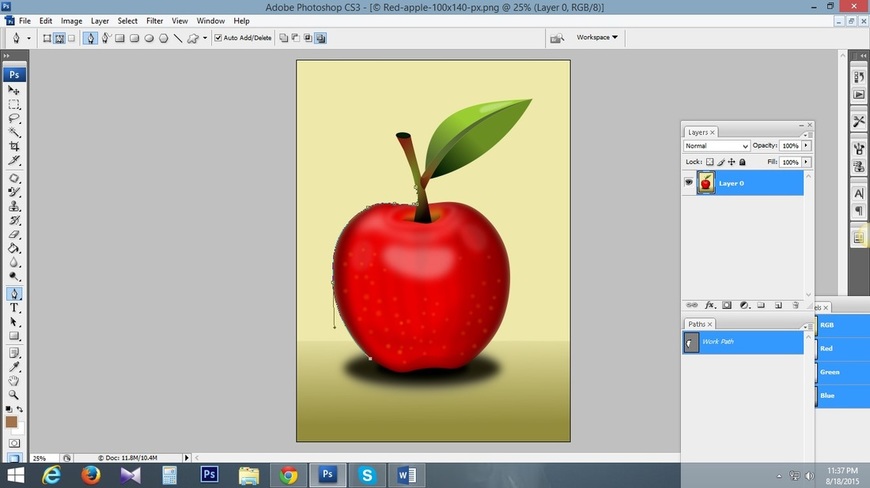
Step-3
Now you have to draw paths every gaps of the image, for this you have to create new path starting point in the same way you have done before and keep drawing till you shut the loop with the place of begin. Keep drawing paths for all gaps. You have completed your paths for your image for removing background. Now see the Image below
Now you have to draw paths every gaps of the image, for this you have to create new path starting point in the same way you have done before and keep drawing till you shut the loop with the place of begin. Keep drawing paths for all gaps. You have completed your paths for your image for removing background. Now see the Image below
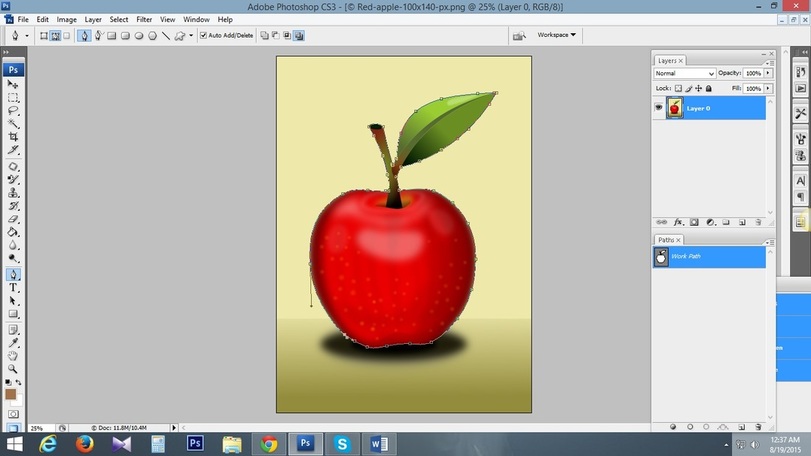
Step-4
How to save clipping path on image?
When you will finish drawing paths all the part of the image then you have to save clipping path in the image for remove the background. To do this you need to go to the path palette, it is located under the window, it is called ‘paths’. Now you will found the path which you have done in “work path” select the layer and double click on this layer and give a name of it. In this way your path is saved. See the image below
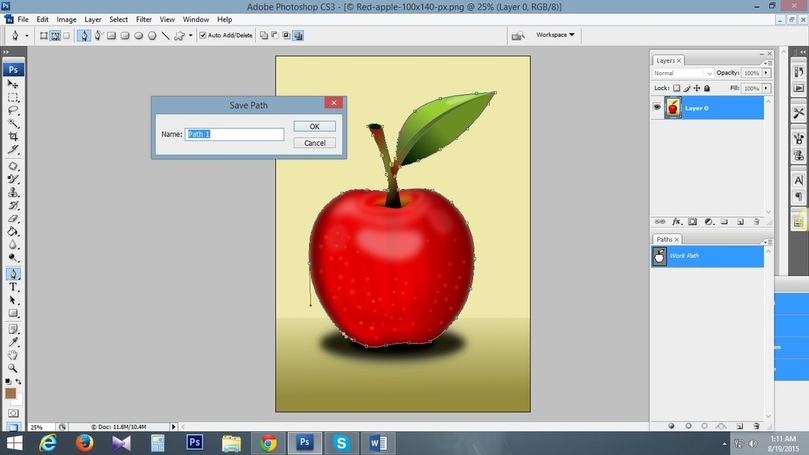
Now you need to click on the pop up menu in path palette in your Photoshop, and select “Clipping Path” when the clipping path window will open you have to click “OK” or put any number of softness in the flat area, you can leave it blank. And we left it blank. Now see the image below.
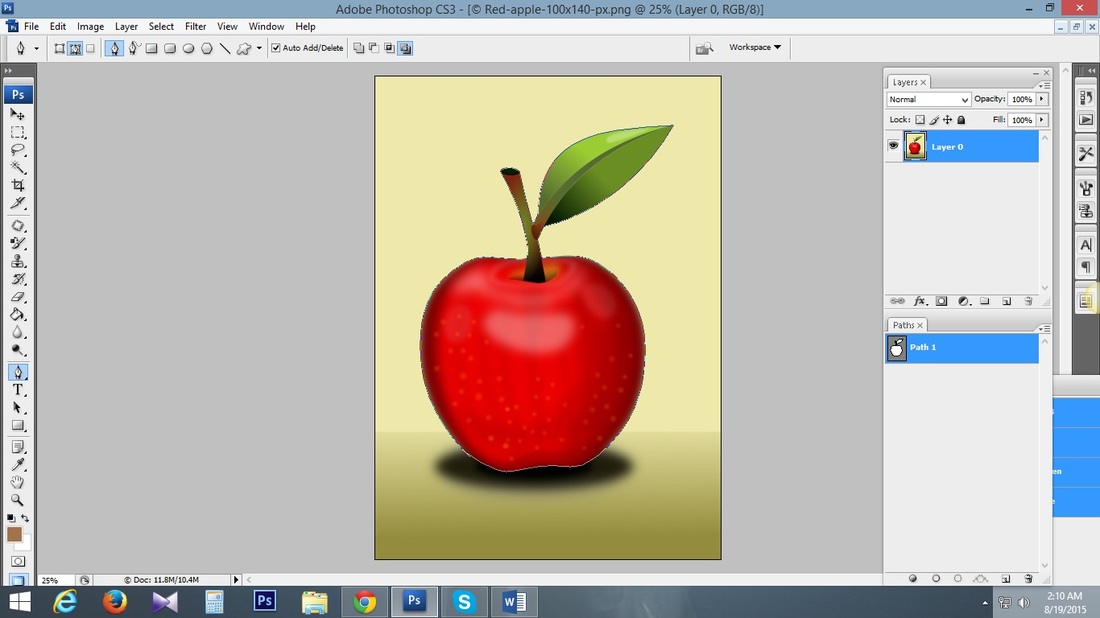
Finally you have finished applying clipping path to this image nicely.
How to remove background using path?
1. After completing path if you want to remove the background of the image then bring the “paths” and “Layer” Palette from the “Window” menu.
2. For selecting the path, press and hold the Control key in the keyboard and click on the path.
3. Holding the Control key + press the “J” in your keyboard. Now you will get a new layer which contains the object that was in the path.
4. Now you have to do the background layer off, and the main object will remain with a transparent background. See the image below.
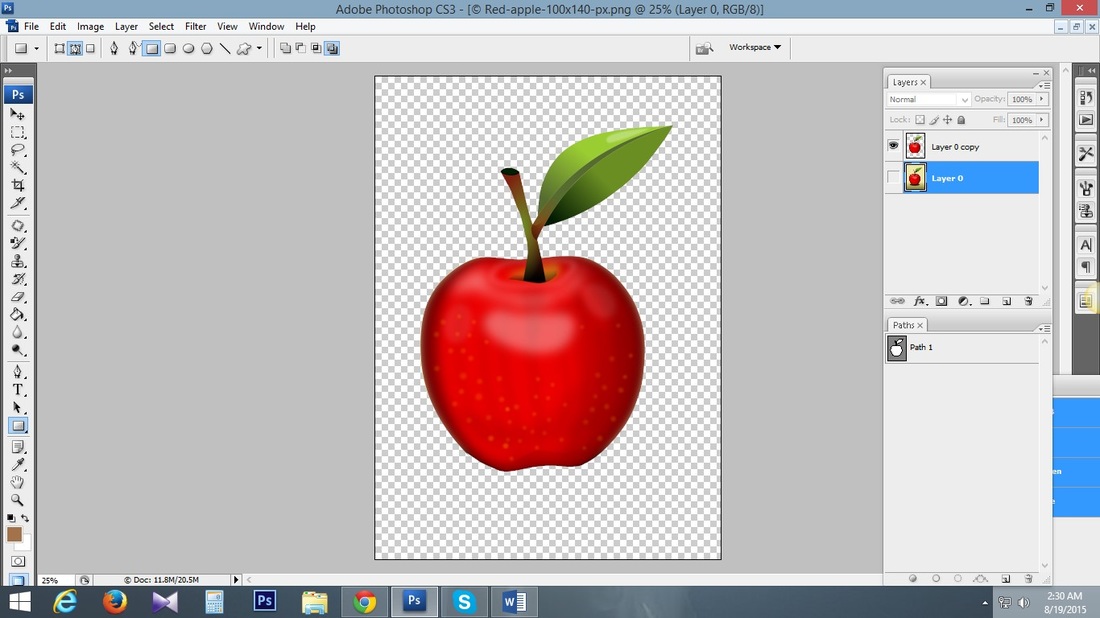
The Best Clipping Path Service
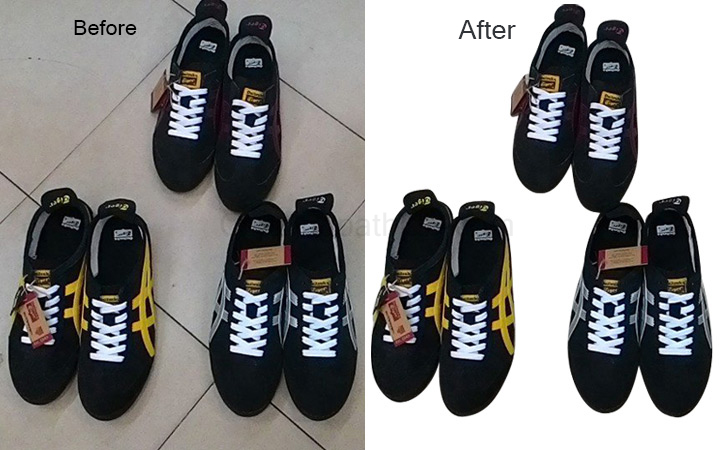
Clipping Path Service
Clipping paths is a surely understood part of visual depiction. Most organizations (particularly online traders) want to showcase particular things without foundation. These entrepreneurs would like to concentrate on the things so as to draw in their objective clients, the purchasers will likewise get a really incredible thought regarding the item. With top quality Photoshop cutting way benefits, site architects can make sites that element high effect pictures intended to draw in target cons. Clipping paths is a surely understood part of visual depiction. Most organizations (particularly online traders) want to showcase particular things without foundation. These entrepreneurs would want to concentrate on the things keeping in mind the end goal to pull in their objective clients, the purchasers will likewise get a really extraordinary thought regarding the item. With top quality Photoshop cutting way benefits, site fashioners can make sites that component high effect pictures intended to draw in target cons
The photograph business has experienced a gigantic advancement in the later times. The universe of photography has changed completely thank to the progression of innovation. The old system for photography has long ended up out of date with the ahead walk of the new time of photography. Aside from the part of computerized imaging, a noteworthy part is being played by the PCs in photography. A photograph programming aides in the control of pictures of the same number of courses as needed. This has wound up in making the photograph business all the more lucrative. There are very much various organizations that offer administrations. There are different organizations offering picture cutting way administrations and one must make legitimate exploration before taking the administrations of an expert organization. There are various advantages that a cut-out way organization offers to its customers. More
There are probably the most fundamental perspectives or elements that draws the distinction between a section way organization and other photograph organizations. The distinction issues from the nature of work that they convey to the customers. They offer to clasp cover administrations at truly sensible expense while their group of capable, commendable, experienced, talented, and submitted experts manages the complete photograph work without any difficulty and solace. Their administration is mindful of the way that it is essential to have both experienced and gifted experts. The laborers are offered to prepare now and again in order to enhance the nature of administrations. The most vital criteria are experienced and mastery. Upkeep of nature of conveying administrations is another critical criteria cutting way administrations are adequate to distributed homes that are unbelievable for action remarkable printing work. These are the organizations that use these administrations in bottomless more extensive judgment. Cutting ways benefits additionally is adequate to a scope of printing practice organizations. Organizations and style studios conjointly use cutting way benefits excitedly. to know more: Clipping Path Lab
